Monday, September 28, 2015
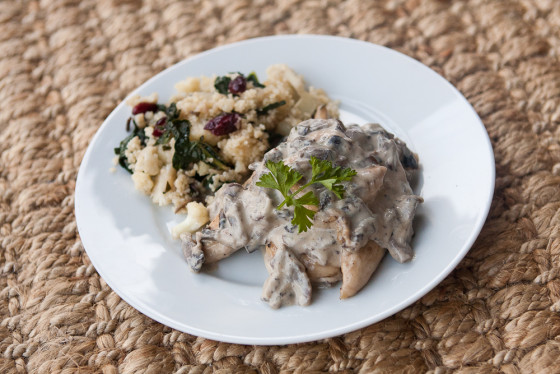
I’ve been slammed busy with family stuff, work, and just trying to keep up with life in general. I had a couple weeks of working extra hours, and while the money was nice, my family certainly suffered as far as healthy, home cooked meals. I feel awful when I eat too much processed/convenience food. When work seemed to be getting back to normal, I scheduled a Green Bean Delivery to ensure we’d have plenty of veggies to get me back on the healthy meal planning track. One of the things I got in my bin was a HUGE portabella mushroom. Luckily it stayed plenty fresh in the fridge until I decided what to do with it.
I vary up where I go to find meal inspiration. But once source I’ve went to lately is Real Simple. Their recipes are often actually pretty simple, just as the name implies. When you have a crazy 3 year old, and a 10 month old that hightails it to the stairs every 90 seconds, the simpler the better. So, when I found this recipe I wasn’t altogether sure how much Nathan & I would like it. We’re not big on chicken breasts, and we’re also not mushroom lovers. (We’re not mushroom haters either.) But I went with it for two reasons. One, it seemed pretty easy, and two, it included goat cheese, which I love.
Sure enough this dish was SO simple to prepare. So simple in fact I was also able to whip up the couscous cauliflower salad you see behind it simultaneously! (I’ll post it later too!) If you like mushrooms, you’ll LOVE this. If you like goat cheese, you’ll surely like this. Even if you are ambivalent towards both ingredients, I think you might be surprised how much you like this! As you can see, while quite tasty, it’s not the most appetizing in appearance, therefore it earns a spot in the Fugly category on my blog.

Print
Chicken with Creamy Mushroom Sauce
Yield: 4 servings
Total Time: 20 min
Ingredients:
1-1.5 lb chicken cutlets
kosher salt and pepper
3 tablespoons olive oil
1 pound sliced mushrooms*
1/2 cup heavy cream
1/2 cup goat cheese
1/4 cup chopped parsley
*I used 1 whole portabella, feel free to get the pre-sliced kind at the grocery, but I certainly loved the flavor of portabella. Cremini would be good too, if you find it.
Directions:
Season the chicken with ½ teaspoon salt and ¼ teaspoon pepper.
Heat 2 tablespoons of the oil in a skillet over medium-high heat. Cook the chicken in batches until golden brown, about 2 minutes per side. Transfer to plates.
Add the mushrooms and remaining tablespoon of oil to the pan and cook, tossing occasionally, until tender, 4 to 5 minutes. Stir in the heavy cream, goat cheese, parsley, and ¼ teaspoon each salt and pepper. Serve over the chicken.
Calories 454 calories; Calories 259 calories from fat; Fat 29 g; Sat Fat 14 g; Cholesterol 153 mg; Sodium 578 mg; Protein 43 g; Carbohydrate 5 g; Sugar 2 g; Fiber 1 g; Iron 2 mg; Calcium 113 mg
Thursday, June 25, 2015
Holy cow it’s been 2 months since I last posted?!? Needless to say May & June are pretty busy months for me. May is the month of Elliott’s birthday and then I have a big work project that ramps up and ends mid-June. I always feel I need a week or two to catch up and recover from it. Once my busy time is over, I feel like summer is just beginning, and then next thing I know it’s almost 4th of July. I’m sporadic at posting as it is, but as always I’ll try to do better.
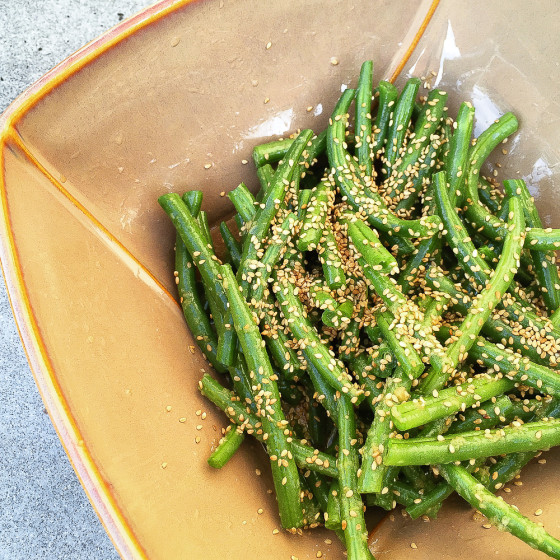
Back in mid May we got invited out to have dinner with friends who were grilling an Asian flavored meal. I offered to bring a side, and I knew I wanted to use the perfect, fresh green beans from my Green Bean delivery bin I’d received just the day before. I wanted a simple, light side that made the beans the star, and this was it. The dressing was simple to prepare, and the dish tasted great. I loved that the beans still had their crunch from just a quick boil. This time of year with fresh vegetables the simplest preparation is often the best!
Print
Green Bean Salad with Asian Style Dressing
Pairs perfectly with an Asian flavored grilled shrimp or steak.
Ingredients:
Dressing
3 tablespoons white-wine vinegar
2 tablespoons rice vinegar
2 teaspoons soy sauce
1 garlic clove, minced
a 1-inch piece fresh ginger root, peeled and minced (about 1 tablespoon)
2 teaspoons Asian sesame oil
1/3 cup canola or vegetable oil
Salad
1 tablespoon sesame seeds
2 pounds green beans, trimmed
Directions:
In a small bowl, whisk together vinegars, soy sauce, garlic, ginger root, and sesame oil. Add canola or vegetable oil in a stream, whisking, and whisk until emulsified. Season dressing with salt and pepper.
In a small dry skillet toast sesame seeds over moderate heat, stirring, until golden and transfer to a small bowl.
In a large saucepan of boiling salted water, cook beans until crisp-tender, about 4 minutes. Transfer beans to a colander and rinse under cold water. Drain beans well.
In a large bowl, combine beans, sesame seeds, and dressing and toss well. Serve salad chilled or at room temperature.
Sunday, April 26, 2015
 Nothing groundbreaking here, just a delicious meal that comes together pretty easily. I had some chicken tenders I scored on sale, and sugar snap peas in my Green BEAN delivery.
We really enjoyed this meal. As I was prepping the ingredients I realized we were out of rice, so I used some rice vermicelli I randomly had in the pantry. As I said, I’m trying to get more of my quick meals on the blog for easy access, and this one fits the bill as something that comes together quick with a tasty kick.
Do you have any favorite quick fix meals to share? If it’s an original recipe, you should enter it in Grean BEAN’s #PlateProud contest. They are giving away $1200 worth of prizes spread out through 5 categories. Each category will have a winning prize pack, and a $50 runner up prize. Some of the categories include Grilling, Kid-Friendly, and Veggie Side. You have until May 22th to enter. You do NOT need a blog to enter!! For all the details, check out the contest page!
Print
Sesame Chicken with Sugar Snap Peas
Yield: 4 servings
Ingredients:
1 1/2 lb. boneless, skinless chicken breast halves, cut into thin strips
Salt and freshly ground pepper, to taste
3 Tbs. sesame seeds
3 Tbs. peanut oil
1 red bell pepper, seeded and cut into thin strips
1/2 lb. sugar snap peas
3 garlic cloves, minced
2/3 cup chicken broth
3 Tbs. soy sauce
2 Tbs. rice vinegar
1 Tbs. Asian sesame oil
1/4 cup chopped fresh cilantro
Serve with steamed rice or cooked rice noodles.
Directions:
Season the chicken with salt and pepper, then sprinkle with the sesame seeds, coating the meat evenly and patting firmly so they adhere.
In a wok or large fry pan over high heat, warm the peanut oil. Add the chicken and cook, stirring often, until golden and nearly cooked through, 3 to 4 minutes. Using a slotted spoon, transfer the chicken to a plate.
Add the bell pepper, sugar snap peas and garlic to the pan and stir-fry until the vegetables are barely tender-crisp, 1 to 2 minutes.
Return the chicken to the pan and add the broth, soy sauce, vinegar and sesame oil. Reduce the heat to medium and simmer until the chicken is opaque throughout and the sauce is slightly reduced, about 2 minutes.
Divide the chicken and vegetables among shallow bowls, sprinkle with the cilantro and serve immediately. Serves 4.
Friday, April 10, 2015

Here at my house we rarely eat ground beef. Instead I opt for ground turkey, chicken, or bison. Ground bison can be pricy, but we love the flavor & health benefits of it. We have a deep freezer, so whenever I catch ground bison on sale I buy a couple packages. I gotta admit, more often than not this is what I do with it! I’ve made this burger recipe so many times because it’s SO easy, and incredibly delicious. My goal is to get more of my go-to easy dinner recipes on the blog. I already have a lot on here that I make over and over, but because it’s so hard to find time (& daylight!) to snap a picture, there are a lot of recipes that aren’t on the blog yet. I’m slowly working to change that!
This recipe calls for so few ingredients. Just ground bison, a can of diced green chills, pepper jack or monterey jack cheese, salt + pepper, & buns. That’s it! For little effort you get a lot of flavor. You can make this with ground beef or turkey, though I haven’t tried it. We’ve cooked these on the grill, as well as in a cast iron skillet.
This time I served the burgers with corn on the cob I bought at the store, and green beans from my most recent Green BEAN grocery delivery. You still have time to use my coupon code bc6effi to save on your first order. It expires May 10th. Also, Green BEAN announced they are extending a discount to former Plumgood grocery delivery customers. If you used Plumgood and are interested in the Green BEAN service click here.
Print
Green Chile Bison Burgers
Yield: 4 burgers
Prep Time: 5 min
Ingredients:
1 pound ground bison or lean (90% or leaner) ground beef
1 4-ounce cans diced green chiles, drained
1/4 cup shredded pepper jack cheese
4 slices pepper jack cheese
1/4 teaspoon salt
1/4 teaspoon freshly ground pepper
4 whole-wheat hamburger buns, toasted
Optional toppings:
1/4 cup thinly sliced red onion
1 additional can of diced green chills, drained
Directions:
Preheat grill to medium-high (or see Stovetop Variation).
Place bison (or beef), 1 can drained chiles, 1/4 cup cheese, salt and pepper in a medium bowl. Gently combine without overmixing. Form into 4 patties, about 3/4 inch thick.
Oil the grill rack (see Tip). Grill the burgers, turning once, until an instant-read thermometer inserted in the center registers 155°F (165°F for beef), 4 to 5 minutes per side. Top each burger with slice of cheese. Cook until the cheese is melted, about 1 minute more.
Optional toppings: If desired, top with sliced red onion & extra can of diced green chiles. I think the green chile flavor is strong enough without, and I don't like raw red onion on my burgers so I did without these.
Tip: To oil a grill rack, oil a folded paper towel, hold it with tongs and rub it over the rack. (Do not use cooking spray on a hot grill.)
Stovetop Variation: Coat a nonstick pan, preferably cast-iron (or a grill pan), with cooking spray and heat over medium-high heat for 1 to 2 minutes. Add burgers, reduce heat to medium and cook, turning once, until an instant-read thermometer registers 155°F (for pork and bison) or 165° (for beef or chicken), 4 to 5 minutes per side.
Per serving: 349 calories; 15 g fat (6 g sat, 5 g mono); 75 mg cholesterol; 26 g carbohydrates; 3 g added sugars; 31 g protein; 4 g fiber; 678 mg sodium; 596 mg potassium.


