Sunday, March 2, 2014

Sometimes I feel somewhat torn when it comes to my blog. I know some bloggers only post original recipes, and I rarely do that. My blog has always been first and foremost, my own personal place to store and record favorite recipes I’ve made. I also just love to share a good recipe I find with other people. Some bloggers have witty intros, updating their readers on their personal life, and I kind of keep a lot of things like that somewhat private. Others add restaurant news & reviews, and I had originally thought I would do that, but kind of feel like other people do that so much better. Plus, while I do have local readers here in Nashville, I think the majority live elsewhere, and don’t care as much about Nashville restaurant news. So, I’ll just continue on the path I’ve been on, mainly sharing recipes here on a sporadic basis. I hope you continue to enjoy!
I’m always on the quest for a new slow cooker recipe to add to my repertoire. As I’ve said before, the less prep, the better. When skimming through the ingredients list here, I definitely like the list of real ingredients. And, with the fresh ginger, curry powder, and more, I expected a meal full of flavor. Luckily I read through the reviews and learned it actually needed more tweaks to pump up the flavor, and included those here. If I had green curry paste on hand I would have added that, but I sadly didn’t.
This certainly lived up to my “ease of preparation” expectations, and the flavor was good on it’s own, however it certainly needed some siracha to really make it pop. We had this two nights in a row, the first served over jasmine rice, the second night I served it with warm naan. Both were delicious!
Read more
Saturday, February 8, 2014

I know what you’re thinking… Cookies in beer!? It’s an insane idea, I know. Something I never would have thought up on my own. When asked if I would be interested in participating in a bake sale to benefit the Tiny But Mighty Fund, a local organization that helps animals in need, I immediately said yes. Our own dog is a mutt, and while we didn’t get him from a shelter, it’s always possible if we hadn’t adopted him, he might have ended up at one. Back to the cookies, I knew I wanted something super special that would stand out at a bake sale, so I browsed cookie links I had bookmarked in the past. Instantly I saw this recipe I had bookmarked from the Beeroness last year.
I had no idea how these would turn out; if they would be as soft & chewy as expected, or if they would end up hard. I worried they might taste weird and overpowering, as I’d never had beer in a cookie. Well friends, let me tell you, these exceeded expectations! They were chewy, buttery, and almost caramely (thanks to all the brown sugar), with just the hint of beer. In fact, there’s only 1/3 of a cup in the whole recipe, which yields 12 cookies. (Note: I doubled the recipe, because I wanted plenty for the bake sale, which is why there are more than 12 cookies in this photo.) The brown ale added a savory undertone to these, which really made them stand out in flavor from any other cookie I’ve ever had. I used a local beer from Blackstone Brewery, a brewpub here in town. I like to support local when I can. I have a feeling these cookies might be in regular rotation around here, seeing as my husband is a craft beer nerd!
Read more
Saturday, December 21, 2013

Stop for just a minute and ponder the title of this post. Chocolate Covered Bacon Fat Popcorn with Sea Salt. Is this a thing? Not to sound presumptuous, but this should totally be a thing. I first discovered the simple genius of bacon fat popcorn while vacationing in Charleston for my birthday back in November. Instead of cooking popcorn in oil, you simply use rendered bacon fat. It’s so basic, the fact that the idea had not occurred to me before is kind of crazy. The version we had in Charleston at The Cocktail Club had some spicy seasoning on it. Not long after we returned I made some, and drizzled it with a bit of butter, and then salt & pepper. It doesn’t taste like bacon, but it has the essence and aroma of bacon.
We cook a lot of bacon in this house, as my dad has taken on the hobby of making his own bacon. I always reserve the rendered fat, like a good southerner, strained through a mesh strainer into a mason jar. My original mason jar was full, and I started another. I began to wonder what I would do with all this bacon fat. Unlike a good southerner, I hadn’t yet discovered uses for it. (Though this Bon Appétit article has some ideas I’d like to try!) Popcorn has turned out to be an awesome use for the leftover fat that might otherwise get thrown away!
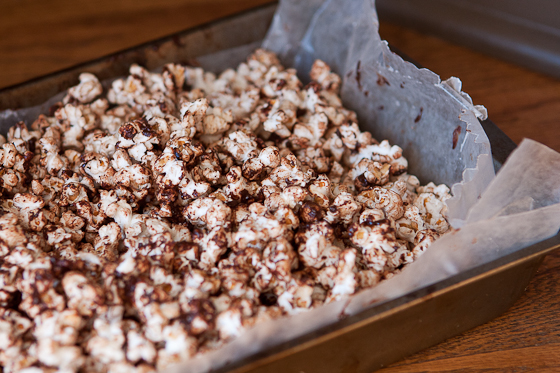
When thinking about doing holiday treats this year, I wanted to do something different than cookies or sugary sweets. I know people sometimes do popcorn balls, or popcorn treats. The idea occurred to me to share my love of this bacon fat popcorn with my friends, and I wondered how a chocolate covered version would taste. It was simple to make, and after I coated it in chocolate, I felt it needed something else, so I sprinkled it with a bit of fine sea salt. PERFECTION! This stuff is so addictive! It really covers the major taste points of sweet, salty, savory. As I said before, the bacon flavor is really an essence or aroma you get, as opposed to straight up BACON. I suppose if you really want an extra bacon flavor, you could chop up fresh cooked bacon and toss that in.
Now, one thing I should mention. As I discovered, this is perhaps best served as a “same day” party treat or snack. I packaged it up and delivered it within a day or two, and I found the popcorn texture lost it’s texture & crunch. The flavor was still great, but I think next time I’ll reserve this as a snack I serve the same day I make it.
Read more
Wednesday, December 11, 2013

This time of year everyone is extra busy. Between shopping for gifts, wrapping those gifts, baking up specials treats, decorating the house, etc etc, ON TOP OF your regular family/work/house/pet duties, it leaves us all stretched for time. That’s one reason I love to turn to my slow cooker during busy times. While my slow cooker tag may not show it, I actually use mine a lot! I often make the same dishes over & over that are already on my blog; I might make a simple pot roast; or I’ll try a new recipe that only ends up tasting so-so, or is so beyond fugly I don’t go to the trouble to take a photo. This was yet another new recipe I was trying out, and I honestly didn’t know if we would like it. I literally braced myself for a flop, as it wasn’t until I was assembling the meal, that I noticed it only had so-so reviews. I’ve never made risotto, let alone a farro risotto. And in the slow cooker?! Wasn’t risotto supposed to be constantly stirred to get that creamy texture and flavor? Luckily, I worried over nothing. I could smell this one working it’s magic, and it ended up tasting as good as it smelled.
My problem with slow cooker meals are that the really simple and easy ones call for “can of cream of _____” or have a lot of ingredients that I’m not a fan of. Then, a lot of the slow cooker recipes that appeal to me as far as “clean” type of foods, using fresh vegetables, etc, are often a multi-step process that nearly always calls for browning meat and practically cooking the whole damn thing before you even put it in the slow cooker. Multi-step slow cooker meals defeat the purpose in my opinion! The prep time for this meal is minimal, and it doesn’t have a multi-step cooking process. I bought pre-chopped mushrooms, so all I had to chop was the leeks. This was almost one of those “dump everything in & turn it on” type of meals, but using “REAL” ingredients. (I will add, sometimes boneless skinless chicken thighs are hard for me to find. The one grocery store that always has them for me is Publix. At other grocery stores I can often find boneless, but with the skin still on. So if you can’t find skinless, you will have to add in the step of cutting the skin off.)
This meal felt like upscale comfort food. I swear, with one bite it instantly shot up to the top of the list of my favorite slow cooker meals. I love the texture of the farro, and was surprised at how creamy it tasted. It’s sad that it’s a little ugly, but I have to say, this was surprisingly delicious. On a cold, dreary day, this could certainly warm & cheer you up. As it turned out I made this on a 75 degree December day, but it still was the perfect meal to come home to as I was exhausted and starving!
 Click more for the recipe!
Read more


