Monday, January 25, 2016
Meal planning. Does anyone really actually enjoy it? Being one of the most indecisive people ever, I know I don’t enjoy it. My 3 year old son while slowly getting better, is still very picky. He loves to tell us “I don’t like that” to every dish before he’s even tried it. My husband has a long-ish list of things he doesn’t like as well, and doesn’t like eating leftovers either. I always try to cook dishes that are fresh, not a “can of cream of this, tub of that”. And I try to utilize ingredients I already have on hand. Because we have a deep freezer, I like to buy organic meat when it’s on sale, and then figure out what to do with it later. Incorporating all those variables can make meal planning difficult!
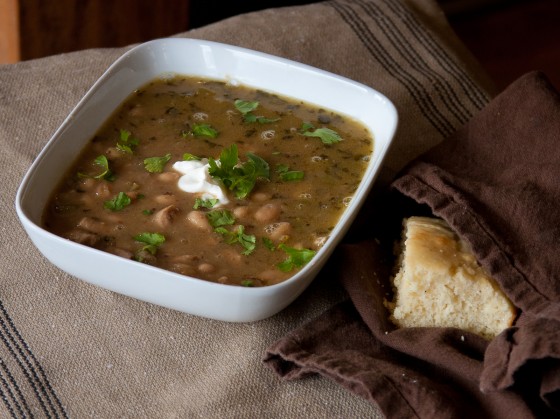
I noticed a package of chicken thighs when taking inventory of the deep freeze, and remembered Nathan mentioning white chicken chili the last time I pressed him for suggestions to the meal plan. With that in mind I did a quick search and landed on this recipe. It came together simple enough and simmered on the stove one quiet day between Christmas and New Years. I served this alongside my favorite cornbread recipe, which sadly I’ve never posted to the blog. Nathan enjoyed this, and I think I might even got him to eat leftovers. Once at least.

Print
Poblano White Chicken Chili
Yield: 6 servings
Ingredients:
1 pound skinless, boneless chicken thighs, cut into 1” pieces
Kosher salt, freshly ground pepper
¼ cup olive oil
1 large onion, chopped
1 poblano chile, seeds removed, chopped
2 garlic cloves, finely chopped
1 tablespoon chopped fresh oregano
2 teaspoons ground cumin
4 cups chicken broth
2 15-oz. cans cannellini (white kidney) beans
1 bay leaf
2 tablespoons fresh lime juice
Sour cream, cilantro, and lime wedges (for serving)
Directions:
Season chicken all over with salt and pepper. Heat oil in a Dutch oven or small stockpot over medium-high heat. Working in batches as needed, add chicken and cook, turning occasionally, until browned all over, 10–15 minutes. Transfer to a plate and set aside.
Add onion and poblano chile and season with salt and pepper. Cook, stirring often, until onion is softened and translucent, 8–10 minutes. Add garlic and cook, stirring, until fragrant, about 2 minutes. Add oregano and cumin and cook, stirring, until fragrant, about 1 minute. Add chicken broth, beans and their liquid, bay leaf, and chicken and bring to a simmer.
Season with salt and pepper and cook, partially covered, stirring occasionally, until meat is cooked through and tender and liquid is slightly thickened, 30–35 minutes. Season with lime juice and more salt and pepper. Serve with sour cream, cilantro, and lime wedges.
Wednesday, January 6, 2016

I grew up in a family that ate Hoppin’ John on New Years Day. For those not familiar with it, Hoppin’ John is a rice based dish with sausage & black eyed peas. My family kept it pretty simple, with just those ingredients plus seasonings. I liked it, but Nathan has never been a fan. The black eyed peas are supposed to bring you luck for the new year. Greens are supposed to bring you luck in the new year as well, signifying money. I did not grow up in a family that ate greens ever, let alone on New Years Day. My family sometimes had boiled cabbage instead. I hope to never eat (or smell) boiled cabbage again in my entire life. In years past I’ve tried different variations on some of these traditional dishes, with feedback that varied from ho-hum to distaste. Yet every year I vow to find a recipe Nathan will actually like.
This recipe does not incorporate black eyed peas in any way. But it’s got the greens, and it’s got the flavor of the sausage and broth that are familiar to me in the Hoppin’ John, with a unique Asian twist. My plan was to serve this alongside this recipe of Martha Stewart’s for Hearty Blackeyed Peas. I didn’t manage to get the beans prepared, but I made them the following day.
This fragrant soup was warm, satisfying, slightly exotic, and yet slightly familiar to me. Nathan’s comment was “Pretty good.” Well, that was after he added in some sriracha. This recipe will warm up any cold winter day, and comes together pretty easily. Buying bagged and chopped mustard greens will save you time as well. I doubled this recipe and froze some, sans noodles. Now when I want to serve it again, all I need to do is cook the noodles.
Print
Spicy Pork & Mustard Green Soup
Yield: 4 servings
Prep Time: 5 minutes
Cook Time: 30 minutes
Total Time: 35 minutes
I couldn't locate Sichuan peppercorns in my local grocery, but I presume you could find them at an Asian or international market. I subbed a bit of white pepper, but I think it would be fine without.
Ingredients:
½ pound ground pork
2 cloves garlic finely chopped
2 teaspoons finely grated peeled ginger
1 teaspoon Sichuan peppercorns, crushed
¾ teaspoon crushed red pepper flakes
½ teaspoon cumin seeds, coarsely chopped
1 tablespoon vegetable oil
Kosher salt and freshly ground black pepper
4 cups low-sodium chicken broth
1 bunch mustard greens, torn (about 4 cups)
4 scallions, thinly sliced
2 tablespoons reduced-sodium soy sauce
1 teaspoon fish sauce (such as nam pla or nuoc nam)
8 oz. wide rice noodles
sriracha for serving (optional)
Directions:
Mix pork, garlic, ginger, Sichuan peppercorns, red pepper flakes, and cumin in a medium bowl.
Heat oil in a large pot over medium heat. Add pork mixture; season with salt and pepper and cook, stirring and breaking up with a spoon, until browned and cooked through, 8–10 minutes.
Add broth and bring to a boil; reduce heat and simmer until flavors meld, 8–10 minutes. Add mustard greens, scallions, soy sauce, and fish sauce and cook, stirring occasionally, until greens are tender, 5–8 minutes; season with salt and black pepper.
Meanwhile, cook noodles according to package directions; drain.
Divide noodles among bowls and ladle soup over, top with sriracha if desired.
Calories (kcal) 370 Fat (g) 16 Saturated Fat (g) 5 Cholesterol (mg) 45 Carbohydrates (g) 36 Dietary Fiber (g) 3 Total Sugars (g) 3 Protein (g) 19 Sodium (mg) 1370
Thursday, October 29, 2015

The same night I cooked the super easy, super delicious Chicken with Creamy Mushroom Sauce, I also made this healthy, delicious side item. Along with that portobello mushroom from my Green Bean Delivery, I had some lacinato kale and cauliflower to use. I found a recipe and did a few modifications and here is the result!
This couscous dish, like the chicken dish, was pretty darn easy to throw together. The original recipe was supposed to be a vegetarian main and included red kidney beans, leeks, and mushrooms. Using what I had on hand, and knowing this was going to be a side item, I simplified this and it was a great seasonal side dish. I loved the tiny bit of sweetness the cranberries provided. This recipe is a definite keeper!
As you can see from my blog, I’m a big fan of the veggies I get from my Green Bean Delivery. And Nathan is a huge fan of the bacon we order too. 😉 Everything we’ve gotten has been top notch. They’ve got a great promotion going on until November 9th. For every friend I refer, they will get $10 off their first order, I’ll get 10% off a future order, AND Green Bean Delivery will donate 10lbs to my local food bank! WIN WIN WIN! If you’ve ever been interested in checking them out (if they’re available in your area), now is a great time to take the plunge! Here’s their website for more info.
Print
Kale, Cranberry, & Cauliflower Couscous
Yield: 6 side servings
Ingredients:
1 cup couscous
1 tablespoon butter
1 tablespoon extra virgin olive oil
2 cups cauliflower florets, cut into 1/2-inch pieces
kosher salt and freshly ground black pepper
1 bunch lacinato kale, stemmed and roughly chopped
1/4 cup vegetable broth
1/3 cup dried cranberries
Directions:
Bring 1 1/4 cups of water to a boil in a small saucepan. Add the couscous, stir, and cover with a tight fitted lid. Turn off the heat and allow the couscous to sit for 5 minutes until all the liquid is absorbed. Using a fork, fluff up the couscous. Transfer the couscous to a large serving bowl.
In a large saute pan, heat the butter and olive oil over medium heat. Add cauliflower, season with salt and pepper. Cook for about 8 minutes, stirring occasionally until softened. Add the kale and cook for about 3 minutes until wilted. Add the broth and cranberries. Cook for 2 to 3 more minutes until warmed through. Remove pan from the heat.
Transfer the veggie mixture to the bowl with the couscous. The couscous will absorb any broth from the veggie mixture. Gently toss to combine. Season with salt and pepper to taste and serve.
Monday, October 19, 2015

(Every once in a blue moon I have time to actually set up a decent photo.)
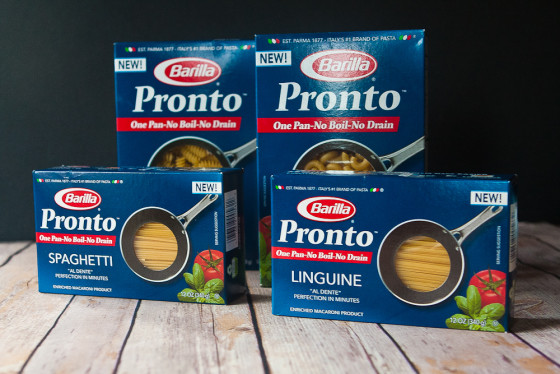
While at the Music City Food + Wine event this past year I visited the Barilla booth and sampled some pasta. They reached out to me around the time of the festival and asked if I wanted some samples of their new line of pasta, Pronto. With Pronto, you can cook the entire pasta dish without boiling the water first, and draining after. You can add in the pasta and water at the same time and cook the whole dish in one pan, rather quickly! I’m being completely honest here, we already use Barilla pasta a lot. I already had a ton of pastas in my pantry, and 90% of them are Barilla. I really like their whole wheat varieties, as well as their veggie pastas. They graciously sent me a big box full of pastas to try. (I am not being paid for this post, nor was there an agreement that I would even post about it.)
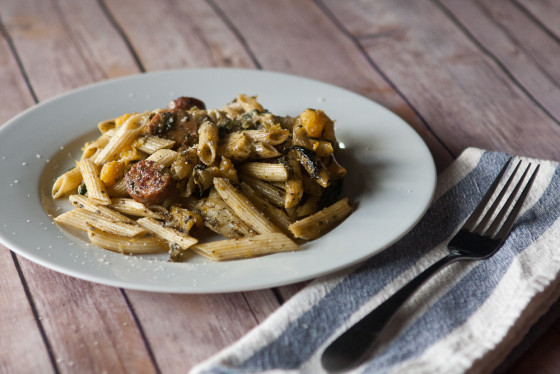
I started out with a basic pesto recipe they provided using a jar of their pesto sauce, but then put my own spin on it. I LOVED the very simple dish I threw together, and I loved how easy it was. The whole family loved it too! I had an acorn squash from my recent Green Bean delivery, and I wanted to incorporate that. I actually roasted the squash, so this wasn’t quite a one pot dish, but close. My husband really prefers some meat with his meal, so I sautéed in some apple chicken sausage and really thought the flavors of that paired perfectly with the squash, pesto & pasta. I think this dish would be great vegetarian if you wanted to omit the chicken sausage. I threw in a handful of spinach when I sautéed the chicken sausage too. To round out the dish was a little bit of cheese. And to be honest the 4 ounces of cheese I used was actually 2 slices of provolone cut up, and 2 sticked of mozzarella string cheese cut up. It was all I had, but it worked great!
Print
Autumn Harvest Pesto Pasta
Yield: 4-5 servings
A great blend of pasta, pesto, seasonal acorn squash, and chicken sausage to round out the meal.
Ingredients:
extra virgin olive oil
1 acorn squash
2 pre-cooked apple chicken sausages (such as Aidells, Al Fresco, or Trader Joe's brand)
large handful spinach
1 box of Barilla Pronto Penne
3 cups of water (or more)
1 8oz jar pesto (I used Barilla)
4 oz mozzarella or provolone cheese, diced
salt & pepper to taste
grated parmesan, optional
Directions:
Preheat oven to 350 degrees.
Cut acorn squash open, remove the seeds. Slice and arrange on a baking sheet. Drizzle with oil and toss to coat. Sprinkle with salt & pepper to taste. Bake 25 to 30 minutes, turning halfway through. Once removed from oven, let cool on pan, then slice into chunks. (I leave the skin on for baking, as once it's roasted the skin is pretty easy to remove before cutting into chunks.)
Slice the chicken sausages into rounds. Heat a large skillet over medium high heat. Add in the chicken sausage & cook until they start to sear. Towards the end add in the spinach and saute until wilted. When done, transfer to a plate & wipe the skillet out.
Pour whole box of pasta into the skillet and add in 3 cups of water, adding more if necessary to ensure water covers the pasta. Turn the burner to high and set timer for 10 minutes. (Optional: add a bit of salt to taste.)
Cook on high, stirring occasionally, until 3/4 of the water is absorbed, at the 10 minute mark. Stir in the pesto and continue to cook for approximately 2 minutes. Then stir in the cheese. Turn burner off, and add in the spinach & chicken sausage, and the acorn squash. Toss together until well blended. Some of my cheese didn't fully melt, but I thought the little globs of cheese were good.
Plate, and sprinkle with grated parmesan if desired.
Recipe inspired by a recipe Barilla provided to me, it isn't available online. Basically the only similarities between theirs & mine is that I used their Pronto Penne & their pesto sauce. I did use it as a base for cooking times.
Thank you Barilla for the samples!


