Thursday, July 2, 2009
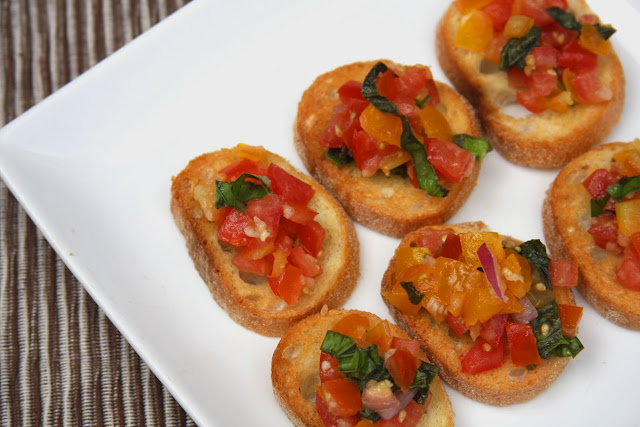
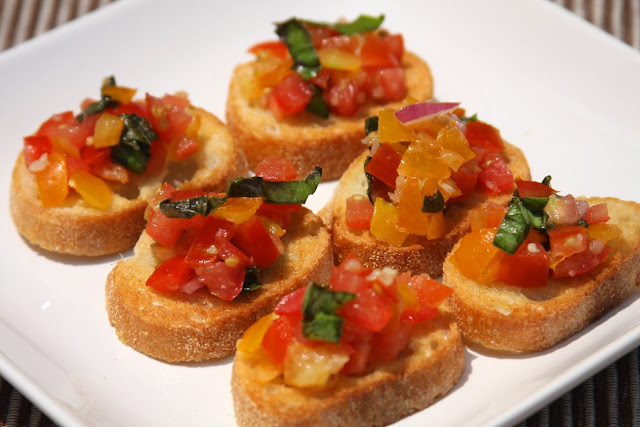
Oh, look, it’s a colorful veggie filled dish on Erin’s Food Files. Anyone surprised?? I’m sorry, I’ll just never get tired of making food that pops off the screen with color.

This was made almost entirely with ingredients in my CSA box. I’m not lucky enough to have a garden, windowbox, or even an Aerogarden to grow any herbs, and in my opinion, herbs can be ridiculously expensive to buy at the grocery. So naturally, I was thrilled when we got a BIG bunch of basil, and it just smelled SO good. We also got a small basket full red, yellow, and orange little tomatoes; and I still had a red onion from my last CSA box. The only thing not from the box was the garlic!

Bruschetta is a simple and adaptable appetizer. You can prep it in advance; and make a lot or a little. I adjusted this according to the amount of tomatoes I had, and it was the right amount for 2-3 servings. (It made more than what’s pictured, but #1 I ate some pre-photoshoot, and #2 I didn’t feel the need to photograph all of it; but mainly refer back to #1)

Print
Tomato Basil Bruschetta
Ingredients:
8-12 cherry sized tomatoes
1/4 of a small red onion
3 garlic cloves (yeah, I like garlic)
10 basil leaves
2 Tbsp extra virgin olive oil, plus more for brushing on the bread
salt
fresh cracked pepper
french baguette, sliced (I always get them to slice it at the bakery!)
Directions:
Dice tomatoes & onion, add to bowl. Crush (or finely mince) garlic. Chiffonade the basil leaves (stack and roll, then slice into small thin strips) and add to bowl. Pour extra virgin olive oil over the vegetables, stir well to combine. Season with salt & pepper. Refrigerate 30-1hr to let flavors develop.
To serve, brush baguette slices with extra virgin olive oil, broil (this is where a toaster oven comes in handy) until golden and crisp. Top with bruschetta. Enjoy!

Tuesday, June 30, 2009
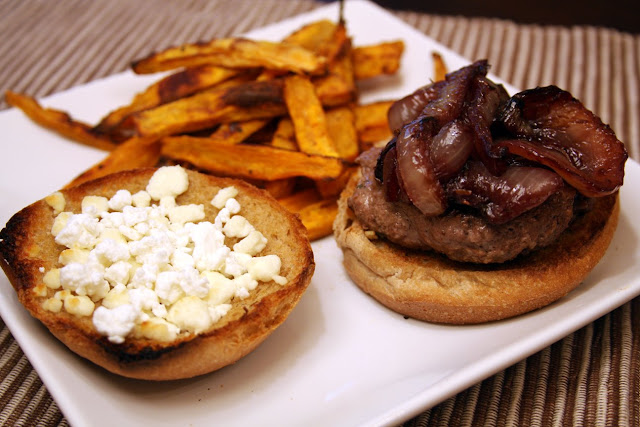
Sometimes you crave a burger. In my never-ending desire for healthier options, I decided to fulfill this craving with a ground beef alternative. No, not a turkey burger or chicken burger; this time I went for a bison burger. Bison has many health benefits; it’s much lower in fat than ground beef. Most bison eat a grass fed diet, instead of corn based grain like cattle are often fed. And, Reader’s Digest even recommends bison as a super food for women to help with iron levels. (Attention KW, might wanna try that next time before donating blood!)
This recipe was pretty simple to prepare, the onions take a bit of time to caramelize, but it’s still a pretty quick dinner. I served ours with sweet potato fries. I really enjoyed the onions caramlized in red wine and topped with goat cheese. I think The Boy would of preferred his without the onions though. Either way, seek out bison next time you’re browsing the meat section of your local grocer!
Bison Burgers with Pinot Noir Onions & Goat Cheese
from Elly Says Opa!
1 large vidalia onion, sliced
1 sprig thyme (I just used dried thyme)
1 Tbsp. olive oil, plus additional for cooking burgers
2/3 cup pinot noir
1 lb. ground bison
2 Tbsp. chopped parsley
2 cloves garlic, finely minced or pressed
salt and pepper
1 small (4 oz) log of goat cheese
4 split hamburger buns
In a heavy bottomed skillet, heat the oil over medium heat. Add the onions and the thyme. Reduce the heat to medium low and cook with a pinch of salt until the onions are soft golden brown, about 25 minutes, stirring occasionally. Pluck out the thyme sprig and then increase the heat to medium-high. Add the wine and cook until it’s almost completely absorbed, about 5-10 minutes.
Meanwhile, lightly mix together the bison, parsley, garlic and salt and pepper. Form into 4 patties, salt & pepper, and cook them however you like–grill, broil, pan fry (the plan was to grill, but The Boy got called into work, so I pan-fried mine), about 2 minutes per side for medium rare.
Broil or toast the buns with the goat cheese on them. Serve the burgers on the toasted buns with the onions.
Monday, June 29, 2009
And the winner is….

Now you don’t think I’d tell you that quickly? Remember? We still have 10 more interview questions!
Erin: What food do you NOT eat?
Clara: Bananas. It’s a texture thing for me. Oh… and it might have something to do with my last memory of eating a banana. Sick little kid+banana flavored puke= not fun. I also don’t like cooked carrots. Again, it’s a texture thing.
Erin: What is your fast food vice?
Clara: No question. Pizza. But there’s nothing like an In-And-Out burger when you get the craving.
Erin: What is your earliest childhood memory with food?
Clara: When my mom would make funfetti cake for our birthdays, she always let me lick the batter off the beaters. Funfetti cake mix batter is like crack to a little kid.
Erin: Name a pantry staple you always have on hand.
Clara: Red food coloring. Blame it on my husband’s midnight pension for red velvet cupcakes.
Erin: What is your favorite food related show?
Clara: Top Chef, Food Network Challenge, Ace of Cakes
Erin: What is your dream foodie lover’s vacation spot?
Clara: I’d love to travel to Paris and Italy someday.
Erin: What is one cookbook you want?
Clara: Since Erin’s been talking about the awesomeness of Martha Stewart’s Cookie book, I need to pick that one up!
Erin: Name 3 things on your baking bucket list.
Clara: Deep-fried cupcakes, Blondies (can you believe I’ve never eaten/baked one?), Wedding cake (multi-level)
Erin: What is your biggest kitchen mishap?
Clara: I am sure that I’ve had bigger mishaps but the first thing that came to mind was using my KA mixer for the first time. Let’s just say dumping flour into the mixer while it’s on at full speed is not a good deal. I was coughing up flour for days…
Erin: What is your favorite spice? Least favorite?
Clara: Is vanilla bean considered a spice? If not then cinnamon. Least favorite is nutmeg much to the disappointment of my husband. He loves a pinch of nutmeg in his coffee every morning. *cough FREAK cough*
I had a LOT of fun doing this giveaway! It was so exciting to find out everyone’s preferences (or indecisiveness!). I learned a lot about giveaways, and I also learned some things about Blogger (and now considering moving to WordPress…). I’m so excited to be able to share a book and kitchen tools I love so much with someone else. Anyone who knows me knows I LOVE giving gifts! I hope the winners enjoy their prizes! So without further adieu, NOW you can find out who won, but you have to go to Clara’s blog to find out!
Saturday, June 27, 2009
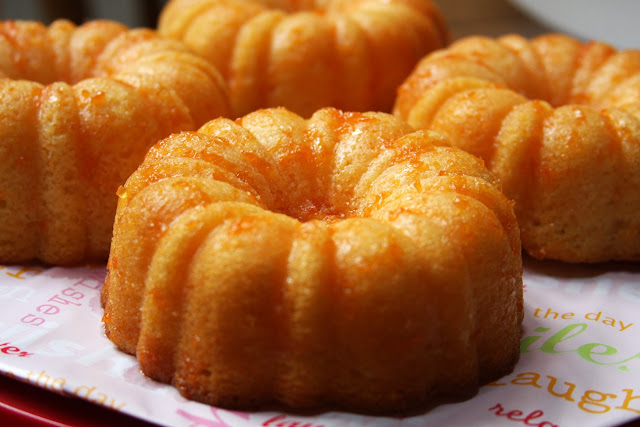
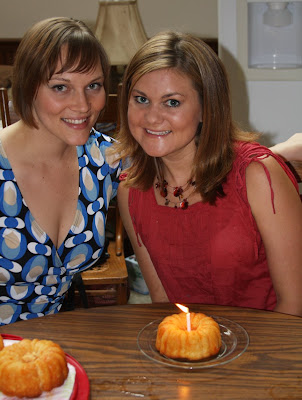
I had a very special friend’s birthday approaching, and I wanted to make her a cake. I wanted to surprise her, but I also wanted to make sure she would like it! I sent her a list of “flavors” of cake recipes I had been wanting to try and let her pick a flavor. She chose grapefruit from a list that included rum, banana, chocolate, caramel, among other flavors.
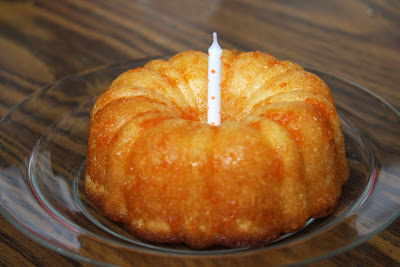
I was excited because the recipe she had chosen was one I had bookmarked for quite a while. And, it was one I had already decided I was going to bake in my Pampered Chef mini bundt stoneware pan. I saw this pan on their outlet a long time ago and knew I couldn’t pass it up! (Did you know Pampered Chef had an outlet? You can score great deals. Ask your PC rep about it, or if you don’t have one, my cousin can help you, kaceymc at gmail dot com). I can’t believe I’ve had the pan for so long, without using it.
When I made this cake, I had a really hard time tracking down whole milk yogurt. I know that sounds crazy right? It’s just… I could find it in the HUGE tub, but I didn’t need 32oz of plain whole milk yogurt. I thought surely to goodness I could find it in a single serve cup at Kroger Publix Trader Joe’s Whole Foods. I considered just using the plain greek yogurt I had on hand, but decided that might be too tart, especially because of the tartness of the grapefruit. Finally, I settled on using 6oz of whole milk vanilla, and 2oz of plain low fat greek yogurt.
I followed Joy the Baker’s instructions on rubbing the zest into the sugar really well. And wow, what an amazing fragrance that created. The wonderful thing is, that sweet/tart aroma lingered in the cake!
*This cake is kinda like us, sweet & tart!* OMG, that was so corny!
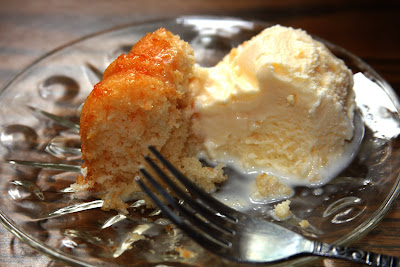
This cake was delicious, but I must warn you, I think it should be reserved for adult palates. It’s not the kind of cake most kids are used to, and the birthday girl’s 4 1/2 year old niece wasn’t a fan. But the adults seemed to like it! We ate ours with a scoop of vanilla ice cream. I think the cool, creaminess of the ice cream really compliments the tart cake.
Print
Pink Grapefruit Yogurt Cake
makes one 10-inch cake, about 12 servings
As seen on Joy the Baker, originally from The Greyston Bakery Cookbook
Ingredients:
2 cups all-purpose flour
1 Tablespoon baking powder
1/4 teaspoon salt
2 eggs
3/4 cup granulated sugar
1 cup plain whole milk yogurt
1/3 cup vegetable oil
Juice and zest of 1 pink grapefruit. This ends up being about 1/2 cup of juice and 1 Tablespoon of zest.
1 teaspoon vanilla extract
3 Tablespoons powdered sugar
Directions:
Position a rack in the center of the oven and preheat the oven to 350 degrees F. Grease a 10-inch round springform pan and line the pan bottom with a parchment paper round and set aside. (I used a stoneware mini-bundt pan, and sprayed it well with non-stick baking spray.)
In a medium bowl, whisk together the flour, baking powder and salt to blend.
On a clean surface, or in a large bowl, combine the granulated sugar and zest. With the back of a spoon or a flexible bench knife, rub the grapefruit zest into the sugar. The essential oils will release into the sugar creating a beautifully fragrant sugar.
In a large bowl, beat the eggs and grapefruit sugar until the eggs are thick and pale yellow. Add the yogurt, oil, 1 Tablespoon of grapefruit juice and vanilla extract. Stir well to combine. Add the flour mixture and stir to combine.
Pour the batter into the prepared pan, smoothing the top with a rubber spatula. Bake for 30-40 minutes, or until the top is golden brown and a wooden skewer comes out clean when inserted near the center. Place the pan on a wire rack for 10 minutes to cool. Run a knife around the edge of the pan to loosen the cake Release and remove the pan sides. Cool completely on the wire rack.
In a small saucepan, combine the powdered sugar and the remaining grapefruit juice and bring to a boil Reduce the heat to a simmer and cook, stirring, for 10 minutes, or until the glaze is slightly thickened. Remove from heat.
To finish the cake, invert the cooled cake and remove the pan bottom. Carefully peel away the parchment paper if you used it. Reinvert the cake onto a serving plate. Pierce the cake all over the top with a skewer and pour the warm grapefruit slowly over the cake. If desired, use a pastry brush to help spread the syrup.
Store at room temperature, wrapped well for 2 days.
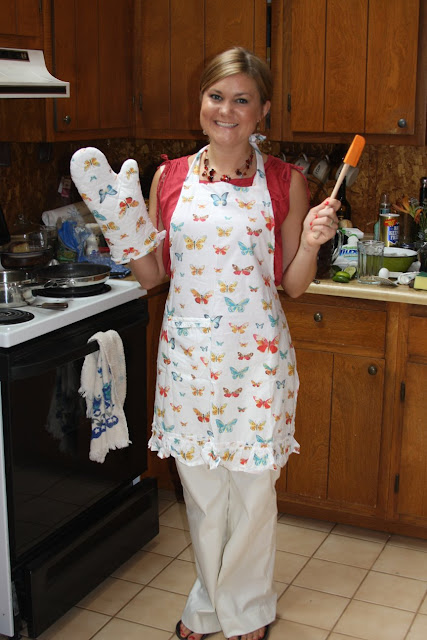
Katie, rocking the oven mitt, apron, and mini spatula I got her for her birthday!


