Friday, May 29, 2009

I’m so happy to bring you the very first post showcasing some of the bounty from my CSA box! My friend & I at work are doing a half share with Delvin Farms. The past two years I did a share with Avalon Acres and was happy with them. They delivered right to our office. But, my schedule has changed, and I now work nights. The coworker I am doing the share with this year works nights too. So neither one of us would be there for the Avalon Acres delivery every week. It just so happens one of Delvin Farm’s drop-off locations is near my friend’s house, so this was just easier for us to be able to pick up. Another difference, is with Avalon Acres, they deliver a half share every week (if you’re doing the half share), and Delvin Farms does a full share every OTHER week (if you’re doing the half share). I’m always one that is up for change, so we’ll see how it all goes!
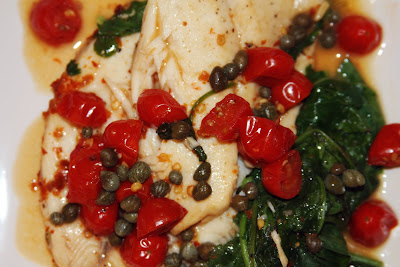
In our first share we got broccoli, kale, arugula, strawberries, sweet potatoes, scallions, & greens. The very first night I made and burned and had to make again kale chips. The strawberries I snacked on, and also enjoyed for breakfast on cottage cheese. I’m pretty sure I’ve never had arugula, so I searched and searched for the perfect recipe. I turned to a trusted source, Martha Stewart. I bookmarked a LOT of ideas, and I had even planned a grocery list around a specific recipe, when I came across this one for Tilapia with Arugula, Capers, & Tomatoes. I had noticed earlier in the morning my grape tomatoes were closing in on their freshness. I wanted to use them up, along with the half jar of capers in the fridge. I texted The Boy who was still home to see if we had any tilapia and we did. SCORE! I love it when dinner comes together without a trip to the store.
Now… I’ll admit I was a bit fearful of how this would turn out and if The Boy would like it. I just wasn’t sure if he’d be into the wilted arugula! When he came in for dinner, I didn’t tell him what we were having, because he gets a little wary of unfamiliar things. I just served it up, and told him he’d have to wait until I got some good photos! It was a rushed photo session as he was hungry, so the pictures aren’t quite what they could be. But BOY, am I glad I made this dish and got the photos to prove it. It must be shared!
There’s a reason I don’t make up recipes; there’s no way I would know to pair all these ingredients together for such a simple dish, and one that doesn’t taste simple at all! I’ll admit I got a little generous with the red pepper flakes. I just didn’t feel like actually measuring, and I know The Boy likes heat, so I just kept on sprinkling! I have a huge block of feta cheese I thought would go well with this dish, as Martha says it’s “mildly Mediterranean” (whatever that means). I forgot to add it before the photoshoot (I told you I was rushed), but when I started to feel the heat as I was eating, I added it. I recommend NOT skipping the feta if you’ve got it on hand. It adds a bit of a creaminess, plus it helps cool your tongue.
This dish came together very fast too. It’s definitely a weeknight dinner. I came home and ate peanut butter out of the jar with a spoon and then cleaned the kitchen before I got to chopping the tomatoes & cleaning the arugula. I didn’t start cooking until 20-25 minutes before The Boy gets home. From what I understand, arugula only keeps 2-3 days in the refrigerator, so if you also get your CSA share on a weeknight, this would be a great choice. I hope you enjoy it as much as we did!

Print
Tilapia with Arugula, Capers, and Tomatoes
Ingredients:
1/2 cup water
1 cup cherry tomatoes, halved
1/2 teaspoon red-pepper flakes
2 tilapia filets (8 ounces each)
Coarse salt and ground pepper
4 small bunches arugula (about 6 cups)
1.5 tablespoon butter
2 tablespoon fresh lemon juice
1 tablespoon capers, rinsed and drained
1 tablespoon feta cheese (optional)
Directions:
In a medium nonstick skillet, bring water to a boil. Add tomatoes and red-pepper flakes; top with tilapia, and season with salt and pepper. Cover, and cook 3 minutes. Add arugula. Cover, and cook until tilapia flakes easily with a fork, about 2 minutes. With a slotted spoon, transfer tilapia and vegetables to a plate (reserve skillet).
Make sauce: Off heat, add butter, lemon juice, and capers to skillet; swirl until butter has melted. Season sauce with salt and pepper. Serve tilapia over arugula and tomatoes; drizzle with sauce. Top with feta cheese.

Wednesday, May 27, 2009
 There are some foods I enjoy seasonally, like pumpkin anything in the fall, okra in the summer. But there are other foods I enjoy year round. Most people think of ice cream as a summer treat, but I find myself enjoying it on the coldest day of the year. I’ll gladly heat up my kitchen making soup on a summer day. With soups I just enjoy being able to eat the leftovers!
So despite the warm temperatures, while the rest of the world was likely grilling, on Memorial Day I made soup! Just like Annie, the minute I saw the ingredients in this soup I knew I’d like it. I’m glad I was able to use some of the homemade chicken stock I made a while back. It helped make some more room in my tiny freezer. If I’d had red peppers on hand I would of gladly roasted them myself. I love the smell of red peppers roasting in the oven.
This soup was a great combo of tasty, healthy ingredients. I love black beans & roasted red peppers. The Boy and I both agreed though, when making this again, I’ll opt for pulled chicken. Whether it’s from a rotisserie or baked by me, I think we would prefer the texture and flavor of chicken prepared that way. Also, I opted for Muir Glen’s Organic Fire Roasted Tomatoes to give it some extra heat.

Print
Black Bean, Chicken, & Red Pepper Stew
Ingredients:
1 tbsp. olive oil, divided
2-3 cups shredded or pulled chicken (or 2-3 chicken breasts, cut up into chunks and cooked)
1/4 onion, chopped
2 cloves garlic, minced
3 cans black beans, drained and rinsed
1 (28 oz.) can diced tomatoes (fire roasted if you can find it)
1 (12 oz.) jar roasted red peppers, chopped (or fresh roasted peppers)
1 (4 oz.) can diced green chiles
4 cups reduced-sodium chicken broth
2 tbsp. cumin
1/2 tsp. cayenne pepper (I didn't have any so I subbed Chipotle seasoning from Pampered Chef)
Salt and pepper, to taste
fresh cilantro (I omitted as we don't like it, but many people do)
Directions:
In a large Dutch oven or stockpot, heat 1 tablespoon olive oil over medium-high heat. Add the onion to the pot and saute until tender, about 5 minutes. Add the garlic and cook 1 minute more. Mix in the black beans, diced tomatoes, red peppers, green chiles, chicken broth, cumin, and cayenne. Add chicken to the pot. Bring the mixture to a boil, then reduce the heat to a simmer. Allow to simmer uncovered for 45 minutes. When finished, remove from the heat, season with salt and pepper and stir in fresh cilantro.

Monday, May 18, 2009

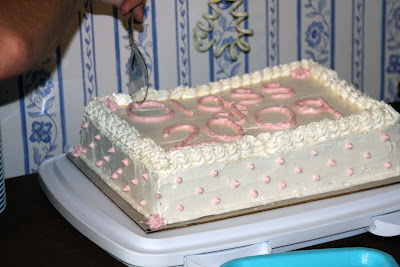
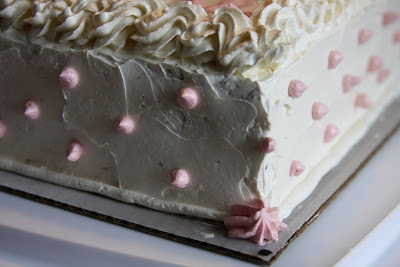
I volunteered to make a cake for the cookout to celebrate my cousin’s graduation from college. My aunt asked for a sheet cake and said either chocolate or vanilla is fine. Well, I’m incredibly indecisive, so I decided to make both chocolate and vanilla cakes. Then, I had the dilemma of choosing the frosting. Chocolate or vanilla? Hmmm… Yet again, I was unable a decision. So, I decided to do a sheet cake that was a double layer cake, with chocolate on one side, vanilla on the other, with chocolate frosting in between the layers, and vanilla frosting on the outside. WHEW! Have I lost my mind? Now, I’m not usually one of those bloggers that tells you a story. But because this cake was to celebrate a graduation, let me tell you a bit about mine.
Graduation is a momentous event in anyone’s life. It’s a milestone of course. It’s a moment when you’re in between where you’re going and where you’ve been. I remember the day I graduated college. At the time, it felt more like a formality. Just something I should do because, everyone does it. It’s what you do when you finish college. As I sat outside on an unusually cold May evening, in the drizzling rain (sounds fun huh?) at my commencement service, they called for the moment of silence. Right then, I suddenly heard “She works hard for the money…. So hard for it honey…” sung by Donna Summer. Whoops, I had forgotten to turn my phone on silent, and it was one of my best friends calling to congratulate me on graduating (which I hadn’t done yet actually). Yes. My ringtone at the time was Donna Summer “She Works Hard for the Money”.
I no longer use “She Works Hard for the Money” as my ringtone. But it was very fitting for the time. I lived and went to school in Bowling Green, KY, an hour north of Nashville. The summer before my senior year I was accepted as an unpaid intern at an incredibly cool, amazing company down in Nashville, in post-production. I still lived in KY, but drove down 4-5 days a week for this internship (when gas was $3 a gallon). I also continued to work at the television station I had been employed at for the past year in Bowling Green 5-6 days a week. There wasn’t a single day I wasn’t at least at one of the two places, and many days I went to both. The hard work during my internship paid off, and my supervisor asked if I’d be interested in working freelance, when they needed me. That then turned into a regular schedule working 2 days a week (while still working 4 days a week at the tv station in KY. Yes, I had two jobs in two different states on top of attending class). The following semester I left the job in KY and moved to Nashville to work 3 days a week, and commuted to class twice a week (my boss actually told me to just quit school, that it was just television and no one would care if I had a degree or not. I think he was only half kidding). Also, when I say I worked 3 days a week? Yeah, scratch the day part, because I actually worked NIGHTS! Sometimes I would get off work at 1am, and have to be in KY the next morning at 9am for a class. Oh, and I still hadn’t written that 6 page paper. Sound crazy? Yeah… It kinda was. I was precariously close to having a nervous breakdown multiple times.
It was hard. I felt like I had a foot in two places. I had the school life in KY and responsibilities there, including papers, and trying to arrange production planning, and shooting & editing schedules for my video projects. But then I would leave all that behind when I crossed the state line to TN. At work I might be given a HUGE workload, and asked to do as much as I could. So I pushed myself to do as much as I could each night I was there, to prove to my employer what kind of worker I was. At times it was OH. SO. HARD. I cried. I wanted to quit; not the job, and not school, just life. I wanted a break from life. I just had to keep looking down the tunnel, at the light, the LIFE, at the end of it. But you know what? I did it. I survived it.
The thing that kept me going was knowing, without a doubt, that I was heading towards doing what I had always wanted to do with my life. Ever since I was a little girl, I would play with the family video camera. I did workout videos with my brother, infomercials with my friends, soap operas with my friends, stop motion animation with my Beanie Babies (hey, at least I found a use for mine, what did you do with yours?). The internship, as I said, lead to a job in that department; though I still wasn’t doing the job I wanted to do yet, but I was in television, and I was learning about the television industry. And now, three years down the road, I’ve been doing exactly what I love to do for well over a year now. I have days where I pinch myself, and say “Am I really here? Did I really do it? Is this what I’m really doing?” And I’m not asking myself this because of WHERE I work, which is pretty cool; I’m asking myself this because I am truly one of those fortunate individuals who is doing what they love to do. There are days I can spend 8-12 hours editing and it feels like only a couple hours have passed. I love what I do, how many people get to say that? I’m not in this for the money, because, despite what people might think, you won’t get rich being a television editor. So… I no longer work “hard for the money”. I work hard because I’m doing the job I always dreamed I would have.
One more thing, then I swear I’ll quit rambling. As I’ve begun to bake & cook more, people at work always say, “You could be a chef!” or “You should open a bakery!” And I always reply, “No, I’m doing what I love right now. I love to edit & work in television. I enjoy baking, cooking, and blogging; but I enjoy it as a hobby. It would drive me nuts to cook or bake all day, every day.” I truly believe I am doing my vocational calling. I guess because blogging is only my hobby, I have ABSOLUTELY NO PROBLEM giving credit where credit it due. If I followed a recipe exactly as it was written, I’ll say “from ____”; if I adapted a recipe I say “adapted from _____”; and if I was inspired by a technique/recipe/product, I’ll be sure to mention “inspired by ____”. I enjoy following recipes. I enjoy browsing recipes (that’s probably why I love delicious so much, it’s fun to browse recipes using their bookmarking tools). Most often I have no desire to make up my own recipe. I like the “hunt” of finding the perfect recipe. When I decided to make both chocolate & white cake, I needed a white cake recipe.
I already have a “go-to” chocolate cake recipe. It’s Hershey’s Perfectly Chocolate Cake. It’s so moist and delicious! If you’ve never made it, you should really consider it next time you want to make a chocolate cake. I’ve paired it with Pumpkin Cream Cheese Frosting for Halloween cupcakes; for my birthday using the Special Dark Cocoa with White Chocolate Frosting, and for The Boy’s birthday with Salted Caramel Frosting. Every single combo was AMAZING. Up until now I’ve never actually paired it with their Perfectly Chocolate Frosting. I always felt that chocolate on chocolate is a little much. I actually think this cake compliments and is complimented by having, another flavor paired with it. So that’s why I chose to put the chocolate frosting in between the layers.
I did a LOT of searching. I even read a great comparison post about white cake recipes by an amazing blogger who writes these incredibly helpful reviews of multiple recipes. But, in the end, for some reason I settled on a recipe from Baking Bites.
Print
Chocolate and Vanilla Sheet Cake
Ingredients:
CHOCOLATE CAKE:
2 cups sugar
1-3/4 cups all-purpose flour
3/4 cup HERSHEY'S Cocoa
1-1/2 teaspoons baking powder
1-1/2 teaspoons baking soda
1 teaspoon salt
2 eggs
1 cup milk
1/2 cup vegetable oil
2 teaspoons vanilla extract
1 cup boiling water
VANILLA CAKE:
1 cup milk, room temperature
6 egg whites
1 tsp almond extract
1 tsp vanilla extract
2 1/4 cups cake flour
1 3/4 cups sugar
4 tsp baking powder
1 tsp salt
3/4 cup butter (6 oz), softened
CHOCOLATE FROSTING:
1/4 cup (1/2 stick) butter
1/3 cup HERSHEY'S Cocoa
1.5 cups powdered sugar
3 Tbsp milk
1/2 teaspoon vanilla extract
VANILLA FROSTING:
1 pound unsalted butter, soft and cut into one inch pieces
3/4 cup and 1/4 cup sugar
1/4 cup water
5 egg whites
1/4 tsp cream of tartar
2 tsp vanilla
Directions:
CHOCOLATE CAKE:
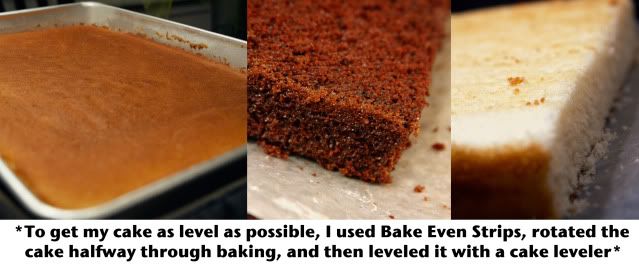
Heat oven to 350°F. Grease and flour 11x7-inch baking pan.
Stir together sugar, flour, cocoa, baking powder, baking soda and salt in large bowl. Add eggs, milk, oil and vanilla; beat on medium speed of mixer 2 minutes. Stir in boiling water (batter will be thin). Pour batter into prepared pans.
Bake 30 to 35 minutes or until wooden pick inserted in center comes out clean. Cool 10 minutes; remove from pan to wire racks. Cool completely.
VANILLA CAKE:
Preheat oven to 350 F. Grease 11x7-inch pan with vegetable shortening, line the bottom with parchment paper, grease the parchment paper and flour the pans.
Combine milk, eggs whites and extracts in a small bowl with a fork. Set aside.
Combine flour, sugar, baking powder and salt in an electric mixer and mix at slow speed with a paddle attachment. Add butter. Continue beating at slow speed until mixture looks like wet sand (If you’re doing this by hand, sift the dry ingredients together and rub in butter).
Add all but 1/2 cup of milk mixture and beat at medium speed for 1 1/2 minutes. Add remaining milk mixture and beat for an additional 30 seconds, scraping the sides of the bowl if necessary. Do not overmix.
Pour into prepared pans and gently shake to smooth batter. Bake 30-35 minutes, until toothpick inserted into the center comes out clean.
Let cake cool in the pan for 15 minutes then invert onto rack to cool completely before frosting. Unfrosted cakes can be frozen for 1-2 weeks.
CHOCOLATE FROSTING:
Melt butter. Stir in cocoa. Alternately add powdered sugar and milk, beating to spreading consistency. Add small amount additional milk, if needed. Stir in vanilla. About 1 cup frosting.
**For some reason I totally ignored the part that said "melt butter". But my butter was completely soft & room temperature. I just beat it with a hand mixer then added the cocoa. It still tastes GREAT, but I am a little curious as to what the consistency would be if I had of actually followed the directions.**
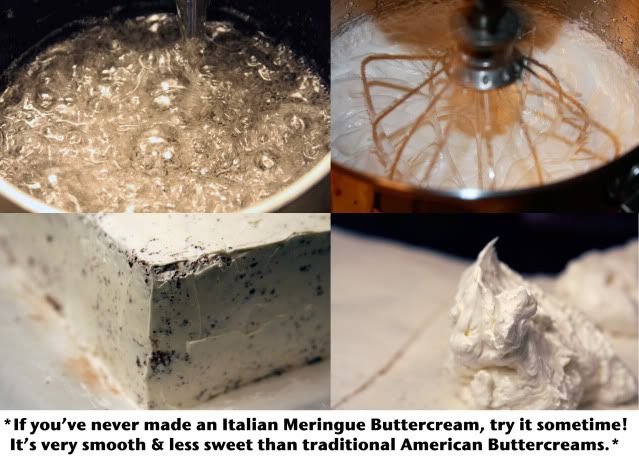
VANILLA FROSTING:
In the bowl of a stand mixer, place egg whites, with cream of tartar and 1/4 cup sugar nearby.
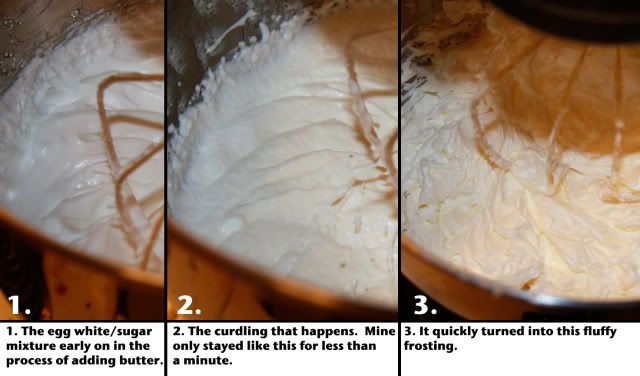
Heat 3/4 cup sugar and 1/4 cup water in a small saucepan. Heat over medium high heat until sugar is dissolved. When sugar reaches 230F on a candy thermometer, turn mixer on medium high. When egg whites are frothy, add cream of tartar. Gradually add the 1/4 cup sugar.
When egg whites begin to form soft peaks, turn the mixer down to medium low and begin to drizzle in the boiling sugar mixture (which should be at approximately 245-250F, firm ball stage). When all of the hot sugar is added, turn the mixer up to medium high and beat until the bowl is no longer warm to the touch.
Add the butter one lump at a time and continue beating until mixture is smooth and fluffy, approximately 12-20 minutes. It will look rather like ricotta cheese for a while - just keep beating!
Once it is smooth, stir in flavorings, if desired.
Keep at room temperature - do not refrigerate.
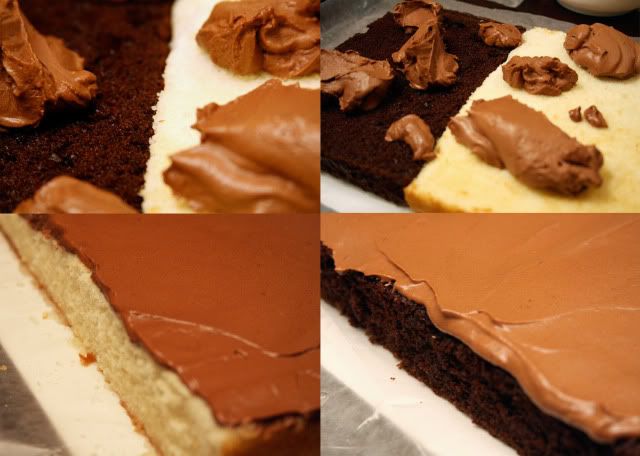
TO ASSEMBLE CAKE:
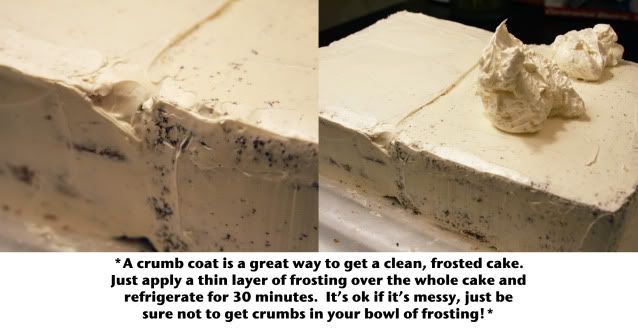
Cut both sheet cakes in half as if you were cutting down the spine of an open book. Remove the left side of the vanilla, and the right side of the chocolate and set them aside on wax paper. Place the two remaining chocolate & vanilla pieces together. Spread chocolate frosting evenly over the layers. Place the layers that were set aside, on the correct flavored layer (the chocolate on the chocolate; and vanilla atop vanilla). Spread a "crumb layer" over the entire cake. Place in refrigerator for a while to set. Once set, spread the remaining frosting, and decorate as desired.
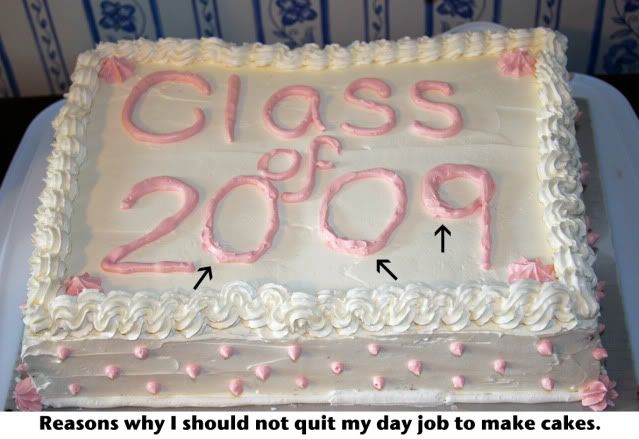
PS. If you want the truth, I chose to write “Class of 2009” because the chances of spelling “Congratulations” correctly with frosting at 2:30am were VERY slim. Seriously.
Sunday, May 10, 2009

To say I love my new camera would be an understatement. I adore my new camera. And the lens? Oh…. this lens. If I could marry it I would. I could cry right now, I’m just so happy to finally have a camera of my own; one I don’t have to take back to my dad. My heart soars right now. Literally… I’m floating high with excitement. (PS. I did NOT pay those prices for my camera & lens. I’m just showing you what I’ve got. I come from a long line of bargain shoppers who know how to find a deal.)
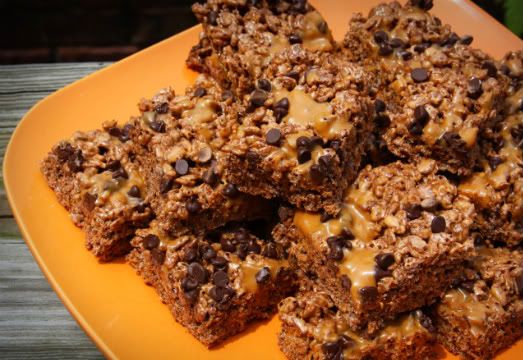
You know what else makes me extremely, excited? Being able to share this incredibly delicious concoction with you. Rarely do I dream up desserts or recipes. Sometimes they work out, and sometimes they don’t. But this dessert I dreamed up, far exceeded all my expectations. It came together tasting better than I could have imagined.
(Hopefully this is the last photo you’ll see on my blog with the point & shoot!)
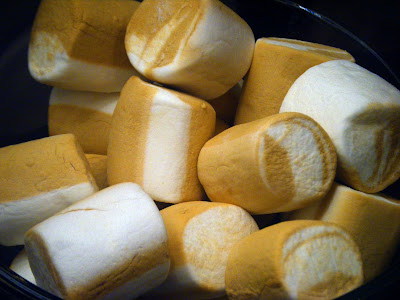
I was first tipped off about these Kraft Jet Puffed Caramel Vanilla Swirl marshmallows when The Stepford Kitchen made Rice Krispie Treats with them. I kept my eye out for them, but the grocery stores I shop at most often are Kroger and Publix, and I’ve never seen them there. Recently I was at Walmart, and (big surprise) browsing the baking aisle, and *ta-da* there they were. I immediately snatched some up, and saved them for the perfect occasion. When we decided to have a casual grill-out potluck for Mother’s Day, I knew this would be just the perfect dessert to bring.
In between the actual buying of the marshmallows & the making of the treats, I began to envision more than just a regular Rice Krispie Treat. First I knew I wanted to pair them with chocolate because who doesn’t love the chocolate caramel combo? So I thought, Cocoa Krispies. Then a couple days passed and I thought to myself “What if I drizzled them with melted candy caramels?” (perhaps this was just a shameless reason to buy candy caramels for later snacking, no?) As I made out my grocery list a couple more days later, I had another thought “I could top them with mini-chocolate chips!”. (yes, these really are the types of thoughts that circulate my brain on a daily basis.)

This dessert would be perfect for a summer picnic, study snack, or afternoon treat. It’s more complex than your average Rice Krispie Treat, that’s for sure. But, it’s not much harder than the traditional treat to make. Finally, I chose to call them Caramel Cocoa Crispy Bars for three reasons. One, I didn’t use real Cocoa Krispies, I used to the Kroger brand Cocoa Crispy Rice. Two, I hate cutesy “kreative” spellings. And three, now we have alliteration. (Didn’t know ya’d get an English lesson today, did ya?)

Print
Caramel Cocoa Crispy Bars
Ingredients:
3 Tbsp butter
1 10oz package Caramel Vanilla Swirl Marshmallows
6 cups cocoa crispy rice cereal
12 candy caramel squares
approx 1 Tbsp cream, half & half, evaporated milk, or any milk (I used heavy cream because I had a tiny bit left in the carton and figured this would be a good use for such a small amount, this is just used to thin out the caramel and make it easier to drizzle)
1/3 cup mini chocolate chips (more or less depending on tastes)
Directions:
Line a 9x13in pan with plastic wrap and spray with nonstick spray.
Melt caramels in double boiler or microwave, add milk or cream once melted and mix together.
Meanwhile, as caramel is melting, melt butter in a large saucepan over low heat. Once butter has melted add marshmallows, stirring occasionally until melted. Once melted, remove from heat, stir in cereal.
Press into pan, (it really helps to use a spatula sprayed with cooking spray to press it down). Drizzle melted caramel on top, then sprinkle with mini chocolate chips. Let cool, and cut into bars. Enjoy!
Recipe inspired by: The Stepford Kitchen
**Warning, if left unattended, these have a tendency to disappear overnight**


