Sunday, June 21, 2009
If you know anything at all about me, you know I LOOOOOVE free stuff. That’s why I’m SO excited to be able to give some of YOU the opportunity to score some free stuff! My adopt-a-blogger suggested we do a little Q&A so our readers can get to know us a little better, along with a giveaway. She loves doing giveaways. What we’re doing is having ONE giveaway, with TWO sets of prizes. We’re going to randomly select two winners. I’ll explain more about the prizes & how to enter, but first let me share with you a little bit more about CB. We answered 20 survey questions and are posting 10 now, and 10 when we post the winners of our prize.
1. Name 10 things in your frig RIGHT NOW.
CB: -80 calorie string cheese (b/c 60 calorie string cheese sucks! Just trust me.)
-strawberries
-1/2 can of cream cheese frosting
-3 mini cartons of half-and-half
-4 dozen eggs
-16 sticks of unsalted butter
-jar of pickles with only 1 pickle left
-Costco size box of Gogurt
-cherry tomatoes (for my bunny)
-Hershey caramel ice cream topping
2. Why did you start a food blog?
CB: – At first it was just a place to keep recipes that I found via the internet or food blogs but as I started getting more and more into blogging, it has turned into much more than a placeholder. More than even a hobby. Now it’s my creative outlet.
3. What is your comfort food?
CB: -Even though I have many comfort foods (see next question), I’m gonna have to go with pizza. Anytime, any day, any occasion, multiple times a day, anywhere.
4. What would your last meal be?
CB: -I would eat as much as humanly possible to delay the impending execution. Makes sense right?
Pizza, cheesecake, pad thai, pho (vietnamese noodle soup), spring rolls, garlic bread, shrimp scampi, bacon avocado cheeseburger, fried zucchini, french fries, chocolate cupcake with caramel buttercream, medium well done steak, Rubios fish tacos, caesar salad, white chocolate & macademia cookies, vanilla bean ice cream, chocolate covered strawberries, creme brulee, king-size snickers bar…
5. What is your favorite can’t-live-without-it kitchen gadget?
CB: -Definitely my empire red Kitchen Aid Mixer. (Thanks MIL!) It’s my pride and kitchen joy. I named her Ginger Spice.
6. What is your favorite blog(s) to find inspiration?
CB: -There are so many bloggers that inspire me but my 3 of my favorites are: Smitten Kitchen, Steamy Kitchen and Dooce. Not only are they amazing bloggers, photographers and writers but they are also true to themselves. Love them or hate them, they are REAL people with thoughts and opinions. I don’t want to be one of those people that gain popularity and cease to have an opinion to please everyone else. Ultimately I want to be ME. Not a sheeple.
7. What are 3 adjectives that describe you?
CB: -dorky
-loveable
-vertically challenged
8. How would you describe your blog to someone?
CB: Cupcake blog: A sweet read for other cupcake addicts like me.
Food blog: A little piece of the internet for me, myself and my food.
9. What are your short term goals for your blog? Long term?
CB: My short term goals are to continue blogging and building relationships with my readers through my stories, recipes and photos. I am also focusing on improving my food photography too. (DSLR for Dummies is on my to-read list.) My long term goal is to someday take that leap from hobby to full-time professional blogger. Who wouldn’t want to make money from something they love right? I want to wake up every morning and say “I LOVE my job!”
10. What do you do when blogger’s block strikes?
CB: – If I force it, it’s rarely my best work so I try to embrace it and ride it out until inspiration hits me again. Maybe with a little Wii yoga while I’m waiting.
————-
Be sure to check out her blog to see MY answers!
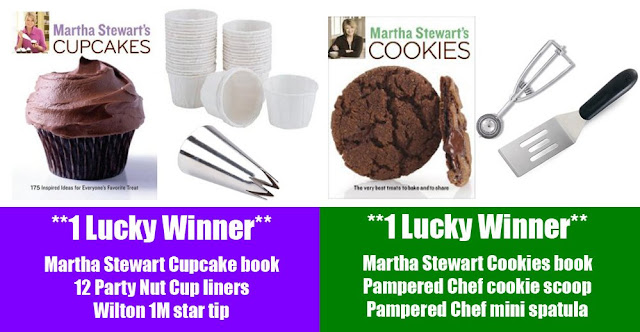
I think this was an awesome pairing. She’s definitely someone I’d be friends with in real life! Considering she has an entire blog dedicated to cupcakes, she wanted her prize to be cupcake related. Here’s what she said about the prizes she chose:
I am a big fan of Martha Stewart. Love her or hate her, the girl knows how to bake so I jumped at the chance to buy her new cupcake book. I’ve made her 1 bowl chocolate cupcake and it’s now my go-to chocolate cupcake recipe. I can’t wait to try some of her other recipes! I have her snickerdoodle cupcakes on the brain next. Of course I couldn’t just offer a cupcake book without some party nut cup liners and my favorite star tip too.

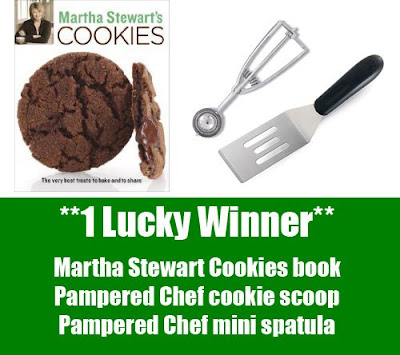
And me, I love me some cupcakes, but I also LOVE Martha Stewart’s Cookie book. (Remember my excitement when I received it as a gift?) I’m so excited to give someone else the opportunity to own that book! I’ve already got a tag dedicated to the cookies I’ve from the book. To go along with the book, I’m also giving away a Pampered Chef Mini Spatula, and Pampered Chef Medium Cookie Scoop. That mini-spatula is just AWESOME! It’s thin metal edge is perfect for cookies. I can’t believe how long I was using my thick plastic one to transfer my cookies. I always ended up with broken cookies. It’s also awesome for bar cookies & brownies. Another way to ensure perfect cookies, is to make them uniform in size. The best way to do that is using a cookie scoop. I made the mistake of buying one at Target. I’m not kidding when I say it broke that very day, on the third cookie I scooped. It just so happens that my cousin is a Pampered Chef rep, (click the link to visit the Pampered Chef store if you’re interested in ordering anything). This is very bad for someone as Pampered Chef obsessed as I am. I’ve slowly been purchasing all the things on my wish list. I now own all the cookie scoops. I could tell from the first instant I held this cookie scoop in my hand that it was stronger and sturdier than the Target one I bought. It hasn’t let me down yet. I’ve been making perfectly round cookies ever since!
So, you’re probably wondering just HOW you can enter to win one of these two awesome sets of prizes. Easy, all you do is leave a comment ON THIS BLOG POST answering this question: Given a choice, would you pick a cupcake or cookie? We’re curious about our reader’s preferences! And just FYI, even if you say you prefer cupcakes, there’s still a chance you’ll win the cookie book, and vice versa. We’re using random.org to pick the winners, so we might end up with two people who both prefer cookies (because cookies are awesome). The giveaway is open from now until Saturday, June 27th at 11:59 ET. Then be sure to check back on Monday, June 29th to find out the winner!!
**Also, this is only open to residents of the US & Canada**And be sure to enter a valid email address so we can contact you if you win**
Good luck!
**ONE ENTRY PER EMAIL**
**UPDATE** Thanks for the comments, the giveaway is now closed! Come back Monday to find out who the winners are!
Friday, June 19, 2009
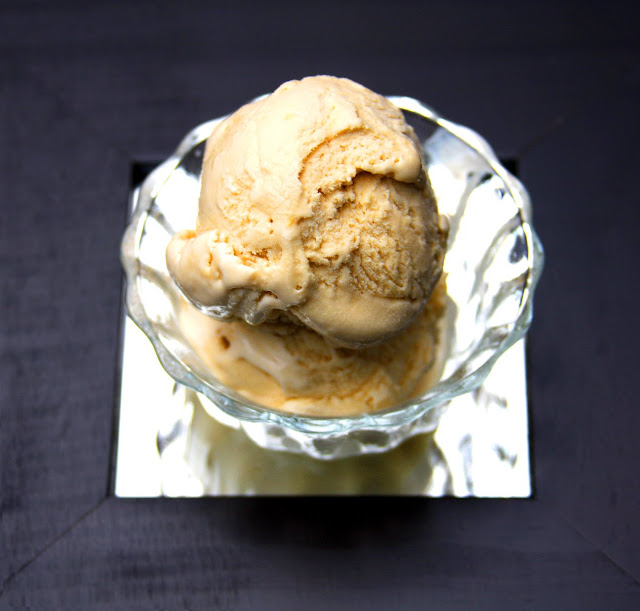
I’m pretty much obsessed with my KitchenAid Ice Cream Maker Attachment. Before I was even done with the first batch of ice cream, I was dreaming of making a second batch. One of my new favorite past times is just browsing ice cream recipes. I’ve made homemade caramel before, so when I came across this recipe for butterscotch ice cream I knew I’d want to try it. Basically the difference between caramel & butterscotch is that butterscotch uses brown sugar while caramel uses granulated sugar. I love desserts with brown sugar in them, so there were pretty good odds I’d like this!

I was able to use restraint when it came to making the ice cream. I held off for a couple weeks. Finally I gave in to my frozen dessert desires & made it. Let me tell you, all that restraint went right out the window once I tasted this. It was smooth, creamy, rich, and most of all, absolutely & incredibly delicious. The buttermilk ice cream I shared with coworkers, but I got greedy with this butterscotch flavor. This batch was consumed in a mere 6 days I think. LESS THAN A WEEK! Granted, this batch made a little bit less than the last batch, but it was still a nice amount! Also, this time, The Boy was an active eater of the ice cream. I was really glad he liked it too. I like having a partner in my calorie consumption.
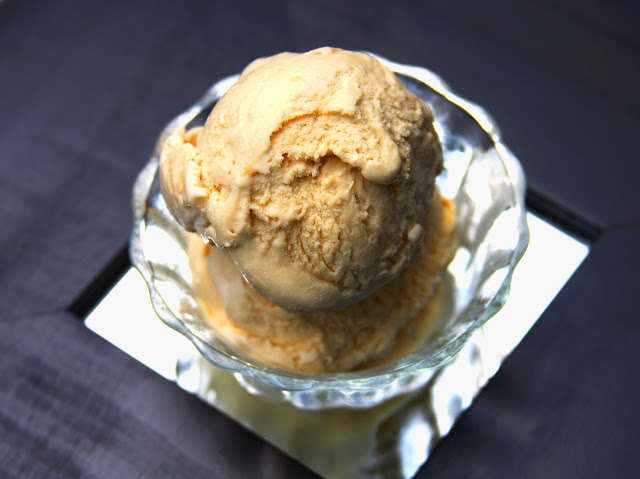
I must admit though, I screwed up a little when making this. I didn’t “temper” the eggs correctly, and probably brought the heat too high. When I strained the custard through a fine mesh strainer I ended up with what looked a lot like little chunks of scrambled eggs. I was a little grossed out, and very discouraged. I went ahead and strained all of it, and put it in a bowl to chill in the refrigerator while deciding what I should do. I asked for some advice on a cooking board, and I googled it. I went against the advice on the board, but found some other advice online that said you can go ahead and churn it, it just won’t be as smooth, and may have a “weird mouth feel”. I hate wasting ingredients so I just thought, rather than dump it, I might as well churn it first to see what I’d end up with. It ended up churning beautifully. I honestly could not tell a THING wrong with this ice cream. I’m so glad to know that I can screw something up, and it still turn out awesome! So, don’t be intimidated by custard-based ice creams. As I’ve said before, if I can do, you can do it!


Print
Butterscotch Ice Cream
Ingredients:
1 cup firmly packed brown sugar
2 tablespoons butter
1 tablespoon vanilla
1 1/2 cups whipping cream
2 cups half-and-half (light cream)
6 large egg yolks
Directions:
In a 1- to 2-quart pan over medium heat, stir brown sugar, butter, and vanilla until butter is melted, sugar is dissolved, and mixture is bubbly, 3 to 4 minutes. Whisk in 1/2 cup whipping cream until smooth; remove butterscotch mixture from heat.
In a 3- to 4-quart pan over medium-high heat, combine remaining 1 cup whipping cream and the half-and-half; bring to a simmer.
Meanwhile, in a bowl, beat egg yolks to blend. Whisk 1/2 cup of the warm cream mixture into egg yolks, then pour egg yolk mixture into pan with cream. Stir constantly over low heat just until mixture is slightly thickened, 2 to 4 minutes. Immediately remove from heat.
Pour through a fine strainer into a clean bowl and whisk in butterscotch mixture. Chill until cold, stirring occasionally, about 2 hours; or cover and chill up to 1 day.
Freeze mixture in an ice cream maker according to manufacturer's instructions. Serve softly frozen, or transfer ice cream to an airtight container and freeze until firm, at least 6 hours or up to 1 week.
 *PS. It tastes great with Hershey’s Dark Chocolate Syrup drizzled on! Thanks for the help Boo!*
**Edit** D’oh! I can’t believe I forgot that I was planning on submitting this to Joelen’s Tasty Tools event for June, the tool featured is Ice Cream Makers! You might remember I also submitted the Buttermilk Ice Cream! Be sure to check back to see all the other ice cream flavors people submitted. I can’t wait to see the round-up and get more ice cream inspiration!
Friday, June 19, 2009
 As I mentioned previously, I’m sharing a CSA share with a coworker. With this share, we get a full share, every other week. We decided that we would take turns picking it up. This was our second box, and my first time picking it up.

Pretty nice bounty, eh? While at the East Nashville Farmer’s Market to pick it up, I stopped by the Provence Bread tent to sample beer bread made with Yazoo beer, Dos Perros. I tried it with their tapenade, and then with an intriguing bright purple dip. I’m always drawn to bright colors in food, so when I was told it was beet hummus, I knew I had to try it. Wow. It was SOOO good! I twittered (tweeted?)* at Provence asking for the recipe, as I received beets in my box and really wanted to try to make it myself. He tweeted back and said he would be glad to give it to me the following week. Unfortunately, I knew I’d be unable to go to the Farmer’s Market that week. So I did some googling, and found a recipe.
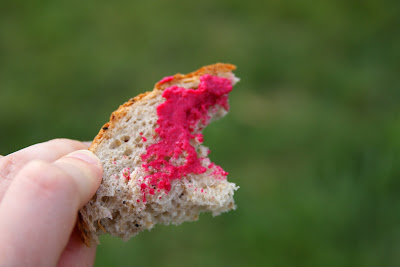
My bread & hummus from Provence, at the Farmer’s Market.
I didn’t stray from the recipe, but next time I’d like to use even more beets, and more garlic. I’d want to use more beets to have a deeper color, and more garlic, because I like my hummus garlic-filled. Still, it was great! I just wished I’d made it before I ate all the Yazoo beer bread. You can dip veggies in it, chips, or crackers. I think this would be a great dip to serve at a pink/purple themed party.
Print
Roasted Beet Hummus
Ingredients:
1-2 medium beets (if you’ve got roasted beets already, this is a great place to use them.)
1 can of chickpeas (also known as garbanzo beans)
1 Tablespoon olive oil
1 small yellow or white onion, chopped finely
3 cloves chopped garlic
1/2 cup tahini or sesame paste (this is a paste of seasame seeds, most likely found in the “ethnic” section of your grocery store or an oriental / near eastern grocery store.)
1 Tablespoon cumin
1/4 cup lemon juice
1/4 cup olive oil
Directions:
Preheat the oven to 450 degrees. On a large roasting pan covered with foil, roast the beets for 40-70 minutes, or until smooth when poked with a fork. Remove from the oven and allow to cool, then peel and cut into small chunks.
In a small frying pan, heat the tablespoon of olive oil. Add the onions and garlic and saute until soft, about 4 minutes.
Whisk together the lemon juice and olive oil in a small bowl.
In a food processor, chop the beets, onions, garlic, and chickpeas together until smooth. Add the tahini and cumin, and process again. Scrape down the sides and bottom of the bowl, then replace the lid. While the blades are running, slowly add the lemon juice and olive oil mixture until the hummus is at your desired consistency.
Makes 2-3 cups hummus
 **I mentioned that I twittered, yup, I gave in to the cult. I don’t twitter as ME, but as ErinsFoodFiles. With the prodding of my adopt a blogger, I finally joined. It’s a lot of fun actually. I mainly follow other food bloggers, so what I see on my feed is lots of conversation about food! 🙂 It’s a fun, growing community that’s embraced me. I’m still learning the ins & outs of it all. But if you twitter, follow me, and let me know if you’re a reader, so I know for sure to follow you too!
Friday, June 12, 2009
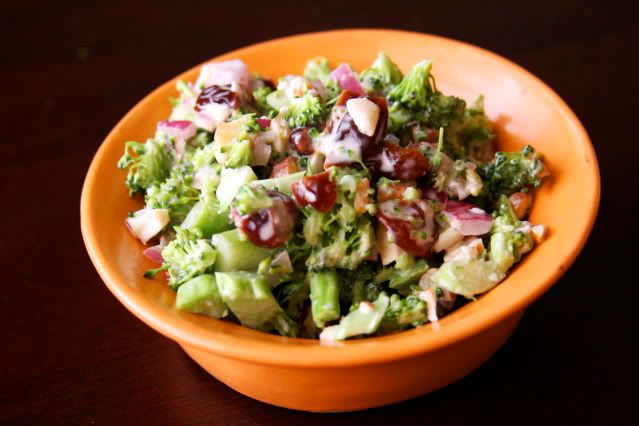
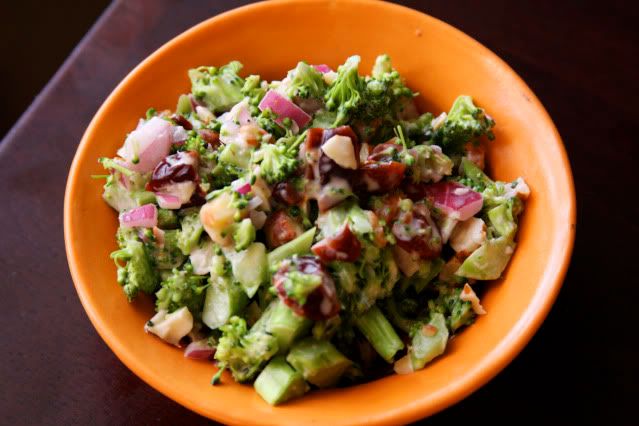
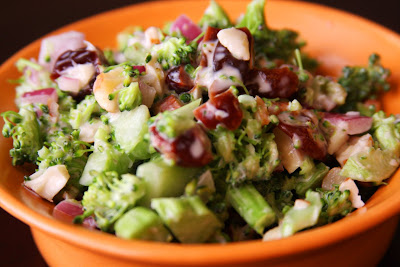
I received broccoli in my CSA and just assumed I’d steam it and serve it with fish or chicken. Well, we decided to grill out one Sunday and invited our friend over with his teenage kids. I began to browse my bookmarked recipes for side items. I quickly zeroed in on this recipe from TheKitchn, as a different way to use the broccoli. Like the original author, I too, remembered a crunchy broccoli slaw in my past and yearned for a healthier version. I ended up changing a couple things from the original recipe. Instead of currants, I used tart, dried cherries. And I made mine even healthier by using a combination of light mayonnaise, reduced fat sour cream, and nonfat greek yogurt instead of just mayonnaise. I really liked the tang the sour cream and greek yogurt gave it. If you don’t have easy access to greek yogurt, feel free to just use sour cream. Or, if you prefer, all mayo. And I used red wine vinegar, instead of rice wine vinegar because I had that on hand.
We all loved the slaw. It went great with our Mojo grilled chicken (thank you Publix marinade), grilled sweet potatoes, corn on the cob, and cocoa brownies with peanut butter chips. The leftovers disappeared pretty fast too! I can’t wait for another cookout opportunity to make this. It just might be my new signature salad dish! The combination of the crunchy chopped almonds, crunchy broccoli, tart & sweet cherries, and the tangy dressing was truly a harmonious union. Uptown Girls, expect to see this on 4th of July!
Broccoli Slaw
adapted from TheKitchn
3 heads broccoli
3/4 cup plus 2 tablespoons dried cherries (I recommend the bigger, plump ones, not craisins)
1/2 cup finely chopped red onion
3/4 cup chopped whole almonds
1/4 cup light mayonnaise
1/4 cup reduced fat sour cream
1/4 cup nonfat greek yogurt
2 tablespoons lemon juice
2 tablespoons rice wine vinegar
2 tablespoons sugar
1 teaspoon salt
freshly ground pepper
Chop broccoli, red onion, almonds, and dried cherries and combine in a large bowl.
Whisk together the mayonnaise, sour cream, yogurt, lemon juice, vinegar, sugar, salt, and a few grinds of fresh pepper. Pour the dressing over the broccoli mixture and stir to combine. Taste and add more salt or pepper, if needed. Allow to sit for 30 minutes (or an hour in the fridge) so the flavors can mingle.