You know how when you’re a kid you find certain foods absolutely disgusting? I distinctly remember crying over having to eat peas for dinner when I was really little. Cottage cheese both looked and sounded disgusting. And I remember being grossed out if I was around someone stirring up pimento cheese. (Actually food sounds still really gross me out. I’m pretty sure I have misophonia.) No chance I would even try it as a kid. Fast forward, I served my kids peas at the dinner table last week. (They were not pleased.) I occasionally eat cottage cheese, EVEN WITH TOMATOES. (When I first started eating cottage cheese in my mid-20s, it was only with pineapple or jam. I swore, never tomatoes.) As far as pimento cheese goes, I think I eased into it. I distinctly remember my first burger with pimento cheese on it. It was back when there were very few restaurants in downtown Nashville worth my time, but Merchants was one of them. My dear old work buddy used to occasionally go out for lunch & order a beer or cocktail. (Miss you Paz!) Anyways, we went to Merchants one day as a splurge, and I got a burger with pimento cheese. SO GOOD… My next restaurant foray into pimento cheese was the Pimento Cheese at Husk. Available at lunch on wood fired bread, and at dinner as an appetizer, this is NOT to be missed. Third, we love the local goat cheese company, Noble Springs, who make a KILLER pimento goat cheese blend. When we’ve got their goat cheese blend on hand we like to add it to burgers. After deciding, ok, I like pimento cheese, I figured it was time to make it myself. I looked at a lot of different recipes before deciding to try this one from Garden & Gun. And you guys, I have no reason to try any other recipe. This is perfection. I gotta say, when it wanted me to grate an onion I was like “How extra we gonna get?”, but really just do it. Don’t change a thing! Duke’s mayo is a MUST. That’s the only mayo I’ve ever used for this, and it’s truly the best mayo. (I’ve never made my own, if you’re into that, go for it!) Don’t make this with some rando off brand mayo, I beg of you.
This is a standard thing to have on hand in warmer times at our house. My husband & I like it for snacking, and especially like it as a topping on our burgers. I’ve made it a few times for family functions, both my side of the family & my husband’s. I always get multiple requests for the recipe. Since it’s such a go-to in my repertoire I had to add it here to share it with many of you! I hope you enjoy it as much as I do. Drop me a comment if you do!
(I have no affiliation with them, but I’ll name drop the brands I like to use. I try to get good brand cheese, and have loved the results using. Tillamook is awesome, Cabot works great. Just try to get something good, and definitely get both the extra sharp white and extra sharp yellow! I shouldn’t have to say this, but you know, DO NOT use pre-shredded cheese. Buy a block, and grate it yourself.)
Perfect for snacking with crackers, on a sandwiche, or as a burger topping.
Ingredients:
1/2 cup mayonnaise, preferably Duke's
1 (4-ounce) jar diced pimentos, drained
1 tablespoon grated Vidalia onion with juice
1 teaspoon Worcestershire sauce
1/2 teaspoon kosher salt
1/2 teaspoon freshly ground black pepper
1/8 teaspoon cayenne pepper
1 1/2 cups lightly packed coarsely shredded extra-sharp yellow cheddar cheese
1 1/2 cups lightly packed coarsely shredded extra-sharp white cheddar cheese
Directions:
In a medium bowl, whisk the mayonnaise, pimentos, onion, Worcestershire sauce, salt, pepper, and cayenne together. Fold in the cheeses with a rubber spatula to thoroughly combine. Transfer to a container, cover, and refrigerate for a few hours before serving to allow the flavors to meld. Use within 1 week.
On school days my kids either have a fig bar or mini bagel for breakfast every day. Just something they can grab & go. On the weekends my husband has taken over breakfast duties, as I like to sleep in. He might just give them a bowl of cereal, or frozen waffles, head out to our new favorite local donut shop, or cook scrambled eggs, bacon, & frozen biscuits. But he never cooks oatmeal, probably because he doesn’t really like it. But I do. And I love that my kids love steel cut oats as much as I do. One of the many days over winter break when my kids were out of school & I had a rare two weeks off work, yet Nathan had to work, I made a batch of instant pot steel cut oats. I love how freaking simple these are. My previous favorite method for cooking steel cut oats, I also got from the website The Kitchn, was to do it the night before, bring it to a boil, and let it sit on the stove. This instant pot version is just as easy, and doesn’t require planning ahead the night before. Both versions I like, but ever since buying an Instant Pot and discovering this method, this is the only way I’ve done it.
We like to top ours with brown sugar, whatever nuts we have on hand (my kids love pistachios), whatever dried fruit we have on hand and a splash of milk or cream. So delicious, and perfect for a cold morning!
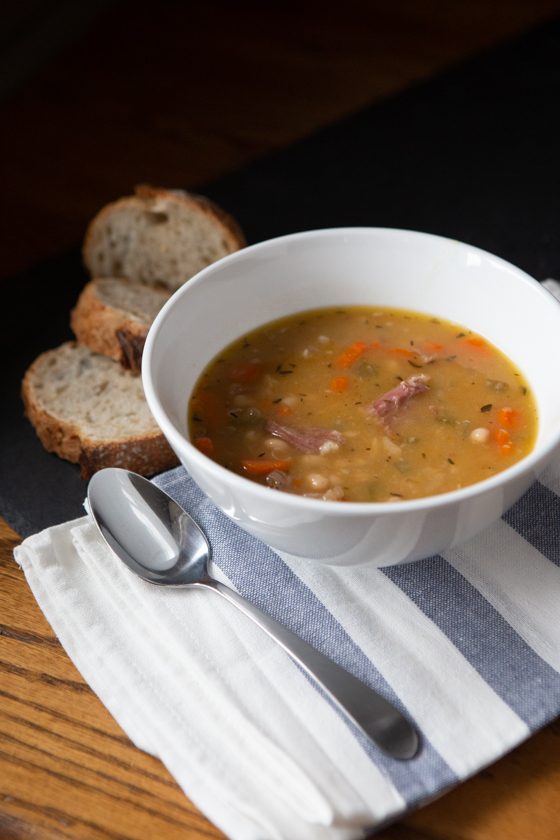
I think it’s hilarious you can see the reflection in the spoon of the “Green Bay Packer House” AirBnB that I unfortunately live next to.
Prepare the pot: Coat the pot of an electric pressure cooker with cooking spray. (I like using coconut oil cooking spray.) Wipe the top edge of the pot with a paper towel to remove any excess cooking spray.
Pressure-cook: Add the water and oats to the pot and stir to combine. Close and lock the lid. For chewy oats, pressure-cook for 10 minutes on HIGH pressure. For creamier oats, pressure-cook for 13 minutes on HIGH pressure.
Naturally release the pressure: When the cooking cycle completes, turn off the machine. To prevent scorching, don't let it switch to the "keep warm" setting. Allow the pot to cool down and release pressure naturally, about 10 minutes. Once the pressure has fully released, carefully open the lid away from you. (Consult your pressure cooker's manual to learn how to tell when it's safe to remove the lid.)
We’ve been living “Soup Sunday” ever since Nashville temps dipped to the 60s (so… you know, like late October). This soup has definitely been in regular rotation. I hate that I haven’t shared this sooner, but I’ve been working killer hours, and just not home when there’s light outside to snap a pic. I love this recipe because meat isn’t the main component of this. It uses an inexpensive cut of meat, and doesn’t have a huge amount of prep or steps. My dad gives us ham hocks every now & then, and we also have a meat supplier we love at the Nashville Farmer’s Market (shout out KLD Farms!) that we’ve bought ham hocks from. Admittedly when I first made this soup Nathan was doubtful it would be hearty enough to fill him up. He prefers a very “meat-centric” meal. He was surprised at how much he liked this soup, and how just the meat from the ham hocks was enough to satisfy him.
I love this soup because there’s minimal prep. Just a little bit of chopping (& peeling of the carrots). When I went in search of a bean soup to make with my electric pressure cooker I was a little flabbergasted at all the recipes that called for canned beans. Y THO? Seriously, I thought the whole thing with the Instant Pot was how fast it cooks dried beans! I found this recipe, and it called for soaking the beans overnight, but I was all “Nah”. I’ve always just added a few minutes to the cooking time, and they turn out just fine. To make up for using dried beans I add extra broth or water. The other modifications I do different from the original is only use half an onion and add an extra carrot. My kids like carrots in soup. Also I like to sauté the veggies before cooking. We love to eat our soup with crusty bread. The recipe below is with all my personal modifications.
This recipe was made in my 6qt Instant Pot. Don’t have an electric pressure cooker? Hang tight, I’ve already modified this for the slow cooker! My FIL’s significant other loved the recipe so much when I made it for them, she wanted to make it on Christmas Day, but only had a slow cooker. I’ll be posting that recipe soon!
Total Time:approximately 2 hours, only .5 is active time
**The actual "cook time" on the pressure cooker is 45-50 minutes, but you must also account for the amount of time it takes for it to come to full pressure, as well as the release time. It's best to do a natural release on this, but if in a pinch after 10-12 minutes you can do a quick release. In reality, not including chopping time, the cook time in the Instant Pot is about 1.5 hours
Ingredients:
1/2 Large Yellow Onion, chopped
3 Ribs Celery, chopped
4-5 Carrots, chopped (chop larger pieces if you want firmer veggies, as they will be soft)
1 Tbps olive oil
4 Cloves Garlic, finely minced
1 1/2 lbs Ham Hock (single, or a combination)
1 lb dry Navy Beans
7 cups Broth (low sodium) chicken or veggie broth (or water)
2 Bay Leaves
1/2 tsp dried thyme
1/2 tsp dried parsley
1/2 tsp Kosher Salt
1/2 tsp Black Pepper
Directions:
Turn instant pot to Sauté function and add oil. Once warmed add onion, carrot, celery and sauté until softened. Turn off and add garlic. Stir, season with salt & pepper.
Add remaining ingredients to the inner liner of the Instant Pot. Stir, making sure the beans are fully submerged. Put the lid on, and set the steam release knob to the Sealing position.
Press the Pressure Cook or Manual button or dial, then the +/- button or dial to choose 48 minutes.
When the cooking cycle ends, turn off the pot and let it naturally release pressure for 20 minutes. (If you're in a hurry, do the quick release after 10.) Carefully release the remaining steam manually, using short bursts at first to make sure the soup won't spew out of the steam release knob. When all steam is out of the pot, and the pin in the lid drops, open the lid facing it away from you.
I’ve been making homemade marshmallows for years. 10 years to be exact. (Does this mean I’m old?) I actually have multiple recipes for them on this blog already. But none are exactly the recipe or method I use now. I figured now is as good a time as any to post my revised method. I made these for the Seasoned Sunday event, and let me tell you… they FLEW off the plate and were roasted & enjoyed in a matter of minutes! Paired with Homemade Graham Crackers and some amazing local chocolate from Olive & Sinclair these made for the best s’mores I’ve ever had in my life!
The revision is really quite simple. I mostly just use Alton Brown’s marshmallow recipe, but I learned a trick from Martha Stewart’s recipe that makes “processing” them (that’s what I call cutting & “fluffing” them, ha) easier.
TIP: I absolutely ADORE my Thermoworks Chef Alarm when making these. There’s never any guessing about when the sugar mixture reaches the right temp, as I set an alarm for 240 degrees and it beeps when it’s there! If you’re looking to spend a little less but still have a quality product, consider the Thermoworks Dot.
Those are affiliate links, which means I get a little kickback if you’re interested in the product as well. I’ve been a longtime user & lover of Thermoworks brand!
Total Time:4 hour 45 minutes (4 hours inactive time)
These make the most amazing s'mores you've ever had in your life, and will also up the ante in your hot chocolate. TIP: If you think you want to use peppermint for a fun seasonal twist, do NOT use a full teaspoon. 1/4-1/2 teaspoon is all you need, anything more is incredibly overpowering.
Ingredients:
3 packages unflavored gelatin
1 cup ice cold water, divided
12 ounces granulated sugar, approximately 1 1/2 cups
1 cup light corn syrup
1/4 teaspoon kosher salt
1 teaspoon vanilla extract
1/4 cup confectioners' sugar
1/4 cup cornstarch
Directions:
Place the gelatin into the bowl of a stand mixer along with 1/2 cup of the water. Have the whisk attachment standing by.
In a small saucepan combine the remaining 1/2 cup water, granulated sugar, corn syrup and salt. Place over medium high heat, cover and allow to cook for 3 to 4 minutes. Uncover, clip a candy thermometer onto the side of the pan and continue to cook until the mixture reaches 240 degrees F, approximately 7 to 8 minutes. Once the mixture reaches this temperature, immediately remove from the heat.
Turn the mixer on low speed and, while running, slowly pour the sugar syrup down the side of the bowl into the gelatin mixture. Once you have added all of the syrup, increase the speed to high. Continue to whip until the mixture becomes very thick and is lukewarm, approximately 12 to 15 minutes. Add the vanilla during the last minute of whipping. While the mixture is whipping prepare the pan.
For fewer but thicker marshmallows use a 9x9 pan, for marshmallows of average thickness, use a 9x13 pan (what I used in the marshmallows pictured here). Line bottom of pan with plastic wrap or parchment leaving long ends for "handles", and spray with nonstick spray. When marshmallows are done whipping, pour into the pan. Spray a strip of plastic wrap with nonstick spray and lay it onto the marshmallows, sprayed side down. Press into the marshmallow mixture to flatten. Allow the marshmallows to sit for at least 4 hours and up to overnight.
When it is time to cut the marshmallows, in a small to medium bowl add the confectioners' sugar & cornstarch and stir lightly to combine. (Some recipes call for just confectioners' sugar, but I prefer to use a mixture, as I have found when using just confectioners' sugar the coating is too sweet and distracting.) Using the parchment or plastic wrap overhang, lift the marshmallows out of the pan and set onto the cutting board. Peel off the top layer of plastic wrap. I like to use a circular pizza cutter to cut my marshmallows, but have also used kitchen shears. Whichever tool you use, grease lightly with kitchen spray, and cut into 1-1.5 inch squares. I like to do 1 line at a time. Pick up each marshmallow and toss it into the bowl to coat. Tap, tap, tap/pat, pat, pat to get excess off, and place into an airtight container. Marshmallows will keep for up to 3 weeks.
Hi, I’m Erin. Welcome to my food files. I love sharing recipes for food, drinks, & dessert; but also like to leave room for any food related posting I desire. Thanks for stopping by! ...more