Wednesday, June 10, 2009
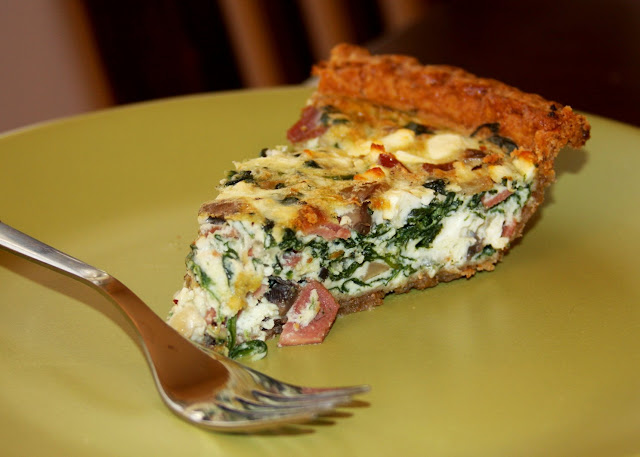 I’ve been wanting to make a quiche for quite some time, and I’ve had an extra whole wheat pie shell in my freezer for too long. A quiche is a great meal because it’s really adaptable to what you have on hand. I couldn’t really find one specific recipe I wanted to follow, so I used this Health magazine recipe as a guide. If you check out that recipe you can see I didn’t follow it too closely! I’m not one that’s big on making up my own recipes, because so often I’d rather follow one, and have a little more confidence that it will turn out right. But I’m really glad I went for it with this recipe. If you’re like me, and timid with your skills, a quiche is a great dish to experiment with. Step out of your comfort zone, and try it! Or, if you’re not ready for that just yet, follow this recipe, because I can assure you, I wouldn’t change a thing about it! This one’s a keeper.
The flavors in this went very well together. Feta has a great salty flavor, and the spinach and mushroom have an almost savory sweet taste. Both The Boy & I love turkey bacon, and it’s all we eat now. I wasn’t sure how well the flavor would stand up in this dish, but I think it was pretty pronounced. A perfect combo. YUM!
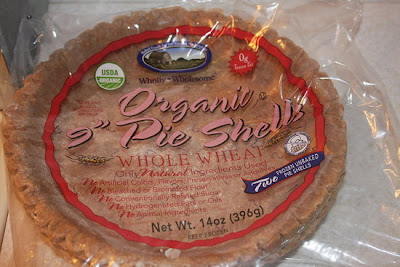
(PS. I think it’s really funny that the Health magazine recipe calls for Wholly Wholesome pie shell, that’s the exact kind I had. They’re made without artificial flavors, colors, preservatives or additives, hydrogenated fats, oils or trans fatty acids, refined sugars or synthetic sweeteners, bleached or bromated flour. And I really like that. Plus, they taste awesome! I always use them in my Caramel Apple Crumb Pie.)

Print
Spinach, Mushroom, Turkey Bacon, Feta Quiche
Ingredients:
1 store-bought frozen pastry shell, such as Wholly Wholesome brand
5 slices turkey bacon
2 tsp olive oil
1/2 cup chopped onion
2 cups chopped spinach
1 cup chopped mushrooms
2 eggs
3 egg whites
2/3 cup half & half
1/2 cup crumbled feta cheese
salt & pepper to taste
Directions:
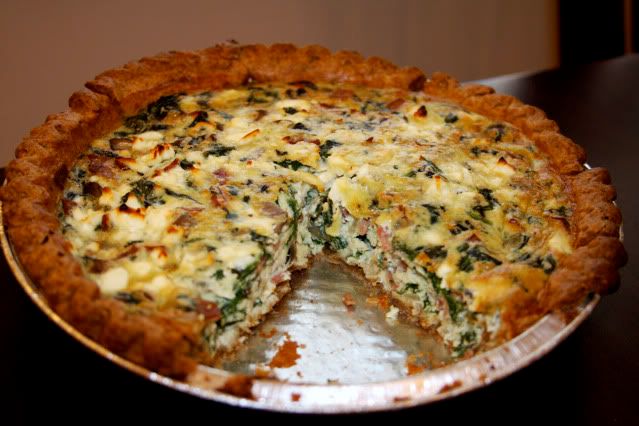
Preheat oven to 375°. Bake pastry shell for 8-10 minutes or until browned. Remove shell from oven, and set aside. Leave oven on.
Chop turkey bacon and saute in a skillet over medium high heat until slightly crispy. Remove from pan and set aside.
Heat oil over medium to medium high heat. Add onion, saute 2-3 minutes until tender. Add mushrooms & spinach. Saute 4-5 minutes until spinach is soft. (Mine got a little watery, so I kept it on heat until most of the moisture had cooked out.) Add turkey bacon back to the pan and stir to combine well.
In a bowl beat eggs, egg whites, and half & half (I did this in my Magic Bullet Blender, and then poured it in the bowl). Season with salt & pepper. Add in veggie/bacon mixture and stir to combine. Add feta, stir to combine, and pour into pie shell.
Bake 20-30 minutes or until completely set, and slightly golden & crispy on top.
Inspired by: Health Magazine
*PS. Leftovers smell and taste DELICIOUS!*
Monday, June 8, 2009

Lust. It’s such a strong word isn’t it?
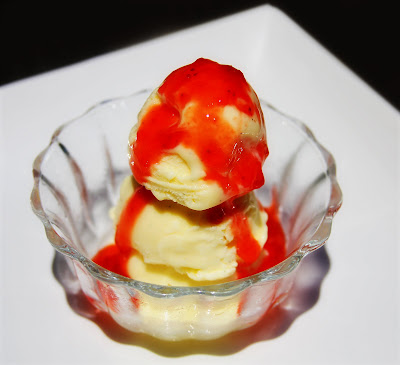
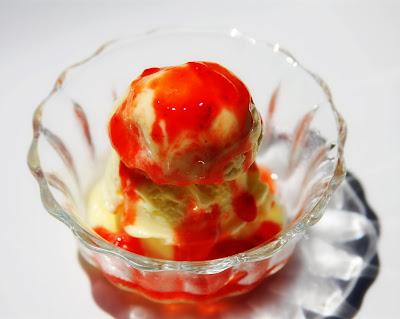
I lusted after an ice cream maker for SO long. I kept seeing posts all over the food blog world about homemade ice cream. Finally, I caved in, and bought one, sneaky-style as a last second bid on eBay. When it finally came in I knew I wanted to make a simple and delicious ice cream, without crazy flavors or a lot of mix-ins. Then I saw this post for Buttermilk Ice Cream in Smitten Kitchen‘s blog. The idea of a buttermilk ice cream was something I’d never tried before. I was intrigued, and decided it would be the inaugural batch of ice cream!
I used real a vanilla bean, and also followed her tip that you didn’t need to use the twelve egg yolks the recipe originally calls for. I used 6 yolks, and still felt it was super creamy. Churning the ice cream was a truly magical experience. I was so excited when it finished. The custard really did churn itself into ice cream! It was soft serve at first, but after a little bit of time in the freezer, it hardened into a scoopable treat. The Boy, believe it or not, isn’t a huge ice cream fan. I did convince him to try the ice cream and he thought it was good, but I guess it wasn’t enough to tempt him to eat a bowl of it. What a weirdo. But I do have him to thank for targeting the flavor. The buttermilk gives it a sweet tartness. He’s the one who first described it as almost like cheesecake! I think this ice cream would be great with graham crackers crumbled up, or topped with blueberry syrup.
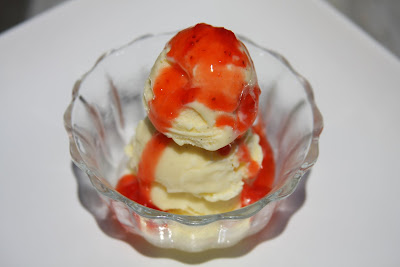
Or, if you’ve got GREAT FRIENDS who share with you their homemade freezer jam made from fresh picked strawberries, then you are very lucky. I just happen to be that lucky. My good friend Jamie made me some jam. When she told me she really enjoyed it best on ice cream, I knew instantly that I would use it as a topping on the last tiny little bit of this buttermilk ice cream I had remaining in the freezer. I had rationed the ice cream to save enough for a picture as I never got around to photographing it! Inspired by Jamie’s jam, I pulled out the ice cream, scooped and stacked it up, topped it with the sweet jam, and took it outside for a little photoshoot. I must say, for my first photoshoot with ice cream, I’m pretty darn proud of myself.
After the photoshoot I stuck it back in the freezer, and later on that night I ate it. Wow… The tart ice cream, plus the sweet jam, is such a good combination. If I didn’t already have 25 ice cream recipes bookmarked, I’d be veeeeery tempted to make this again just to be able to enjoy it with the rest of Jamie’s jam.
 I’m submitting this in Joelen’s Tasty Tools event for June, which is featuring ice cream makers! Be sure to check back at the end of the month for her round up of all the recipes submitted. And check out her other fun foodie events!
Print
Buttermilk Ice Cream
Ingredients:
2 cups heavy cream
1 1/4 cup sugar
6 large egg yolks
2 cup buttermilk
2 teaspoon vanilla or half a vanilla bean, scraped and simmered with the cream
Pinch of salt
Directions:
In a large, heavy saucepan, combine the heavy cream and one cup of sugar and bring to a simmer over medium heat.
In a large bowl, whisk egg yolks and remaining 1/4 cup of sugar.
Remove the cream mixture from the heat and drizzle a small amount into the yolks, slowly, and whisking constantly to keep the eggs from curdling. Do this a few more times to warm up the yolks before pouring the yolk mixture back into the cream, whisking constantly.
Cook over low heat until the mixture is thick enough to coat the back of a spoon. Strain the mixture and whisk in the buttermilk, vanilla, and salt. Cool completely and freeze according manufacturer’s directions.
*Ice Cream photoshoots have to move FAST, because in the blink of an eye, the subject will melt!*
Tuesday, June 2, 2009
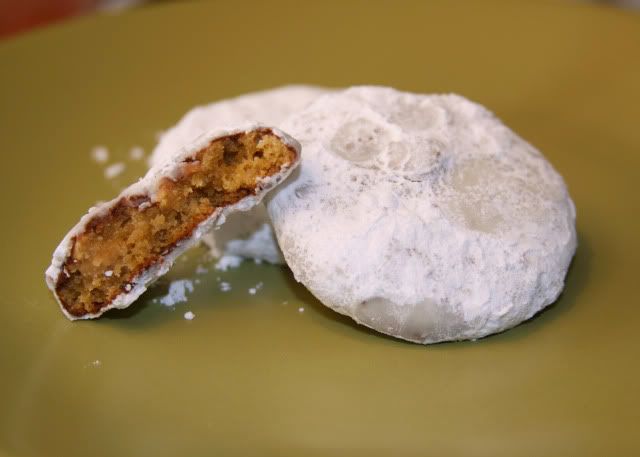
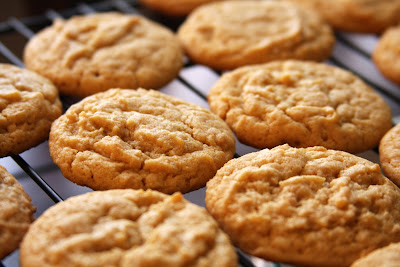
Every once in a while I come across a recipe and go “MUST MAKE NOW!” I saw the recipe for these delectable little delights on Wednesday, and made them on Saturday. That’s pretty fast for me! I mean, I have a mere 102 desserts bookmarked on My Delicious just waiting for me to make. There was just something SO enticing about the combination of a peanut butter cookie and puppy chow (or muddy buddys, or white trash mix, whatever you want to call it, it’s NOT dog food!).
The thing is, I’m really trying hard NOT to eat desserts for a while. To gear up for a 4th of July weekend on the lake, I’m doing a fitness program called “Making the Cut” by Jillian Michaels. It’s an incredibly intense 30 Day workout program. She also has a meal plan, but because of my wacky schedule, it would be too hard to follow. I AM limiting or avoiding alcohol while doing the program. But it’s summer, so I’ll let myself live a little here and there. I can’t make it through the month of June without desserts or cocktails!!
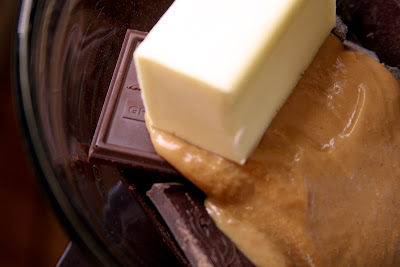
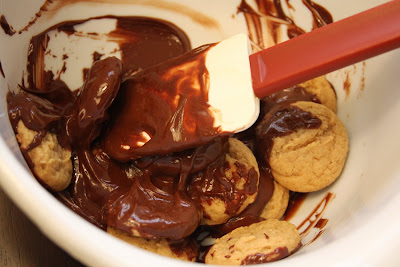
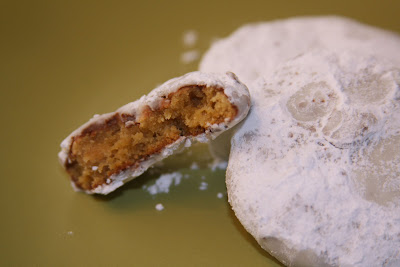
You might be surprised I made this. I mean, the first ingredient is Betty Crocker cookie mix. I thought about skipping the mix, and making some from scratch, but I can’t find the perfect peanut butter cookie recipe I misplaced. I don’t regret using the mix, because these are a bit time consuming after the cookies are done. I don’t want that to discourage you from trying these. They really aren’t hard, it just takes a little time to coat all the cookies and toss them in the sugar because you have to do it in batches. They are worth every bit of effort, trust me.
Because I was limiting my desserts, I was saving myself one to try until later in the day after dinner. But in order to get a picture while there was at least a little light, I asked The Boy to be my taste tester and bite into one. All he said was “Mmm. Pretty good.” That’s it. No excitement, nothing. A couple hours later when I ate one, I bit into it, and immediately said “OH MY GAAAWD! This is SO GOOD! Why didn’t you tell me they were this good?!?” To which The Boy replied “Yeah, they are pretty good aren’t they?” He then proceeded to eat two of them.
They were JUST SO GOOD, I didn’t trust myself with them in the house and sent them off with The Boy Sunday morning when he went into work a telethon at the TV station. (This was the planned intention of these cookies anyway). There were just enough of them left after the telethon to bring into my buddies at work.
Ok, I’ve rambled on long enough. Here’s the recipe for the YUMMY YUMMY treats!

Print
Chocolate Peanut Butter Cookie Treats
Ingredients:
COOKIES:
1 pouch (1 lb 1.5 oz) Betty Crocker® peanut butter cookie mix
3 tablespoons vegetable oil
1 tablespoon water
1 egg
COATING:
1 cup semisweet chocolate chips (6 oz)
1/4 cup butter or margarine
1/4 cup peanut butter
1 teaspoon vanilla
1 1/2 to 2 cups powdered sugar
Directions:
Heat oven to 375°F. In large bowl, stir cookie mix, oil, water and egg until soft dough forms.
Shape dough into 1-inch balls. On ungreased cookie sheets, place balls 2 inches apart.
Bake 8 to 9 minutes or until edges are light golden brown. Cool 2 minutes; remove from cookie sheets to cooling racks. Cool completely, about 15 minutes.
In small microwaveable bowl, microwave chocolate chips, butter and peanut butter uncovered on High 1 minute to 1 minute 30 seconds; stir until smooth. Stir in vanilla.
Place 1 1/2 cups powdered sugar in 1-gallon resealable food-storage plastic bag; set aside. Place 12 cooled cookies in large bowl. Pour 1/3 of chocolate mixture over cookies in bowl. Using rubber spatula, toss cookies gently to coat. Place cookies in bag with powdered sugar; seal bag. Gently turn bag to coat cookies. Remove cookies from bag to cooling rack to set. Repeat with 12 more cookies and 1/2 of remaining chocolate mixture; repeat again until all cookies are coated, adding additional powdered sugar to bag as needed.
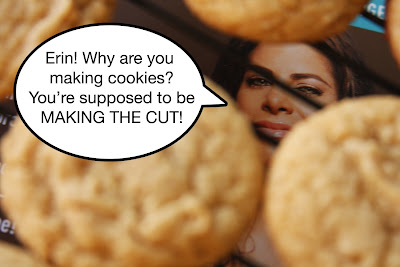
(I’m sorry Jillian! I only ate one I swear!)
Sunday, May 31, 2009
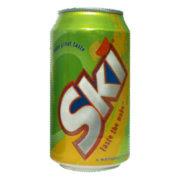
There’s a soda that’s only available in central Kentucky. It’s called Ski. Most people compare it to Mt Dew, but more citrus-y. It’s a bit of an addiction to a lot of people in my hometown area! Whenever a young person moves away, it’s the first thing they ask their parents to bring them when they come to visit. It truly tastes best if you can get it out of a bottle, a GLASS bottle. I was able to get it that way up until a couple years ago, but it got bought by another bottler, and ever since then I’ve never seen it in real bottles again. 🙁 So the second best way to drink it is out of a can.
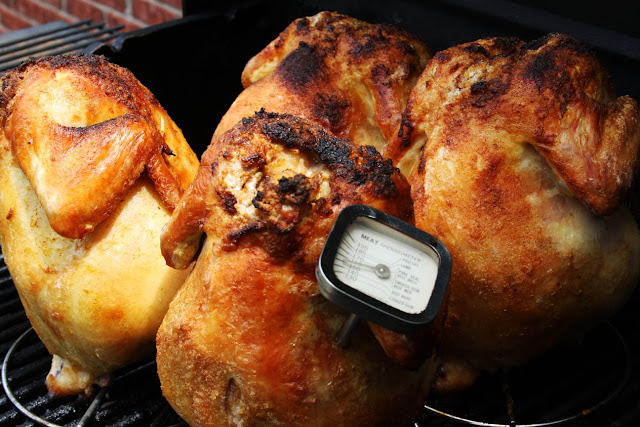
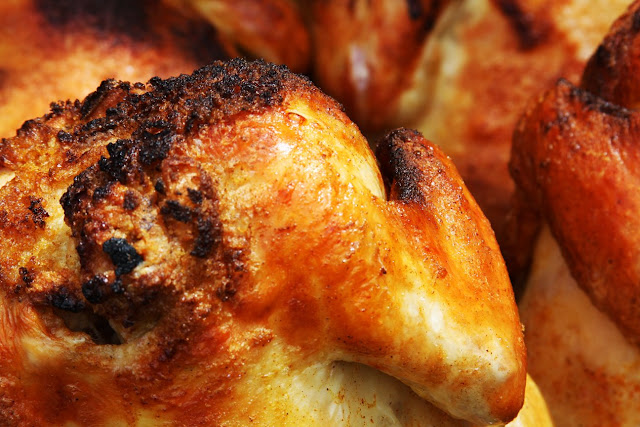
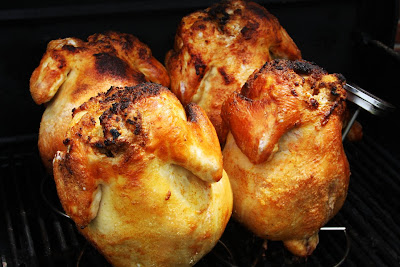
 When The Boy & I went to my parents for a Mother’s Day cook out, I was told we’d be having beer can chicken. Once I got home, I discovered we were actually having SKI CAN CHICKEN! I wasn’t too surprised because I don’t really come from a family of big drinkers, (I know you’re surprised considering my alcohol tag). So instead of beer, my dad substituted Ski.
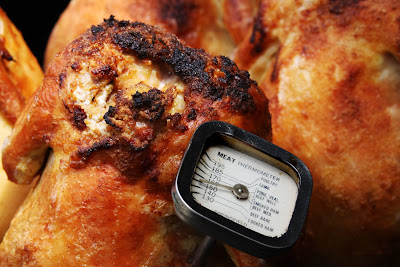
Ski can chicken isn’t much different than beer can chicken. The only difference is, you use Ski instead of beer. (Duh) I think I could taste the slight citrus flavors from the soda. Next time your grilling out, consider this method of cooking. The end result is very moist & flavorful. You could always use beer, or substitute a regional soda that’s special to your area.
I love regional specialties. I know one of TN’s regional specialties are Goo-Goo Clusters.
Does your area have a regional specialty you can’t get anywhere else? Soda, snack, or what?
I’d love to know what local products to look out for when traveling.


 I’ve been wanting to make a quiche for quite some time, and I’ve had an extra whole wheat pie shell in my freezer for too long. A quiche is a great meal because it’s really adaptable to what you have on hand. I couldn’t really find one specific recipe I wanted to follow, so I used this Health magazine recipe as a guide. If you check out that recipe you can see I didn’t follow it too closely! I’m not one that’s big on making up my own recipes, because so often I’d rather follow one, and have a little more confidence that it will turn out right. But I’m really glad I went for it with this recipe. If you’re like me, and timid with your skills, a quiche is a great dish to experiment with. Step out of your comfort zone, and try it! Or, if you’re not ready for that just yet, follow this recipe, because I can assure you, I wouldn’t change a thing about it! This one’s a keeper.


