Saturday, May 9, 2009
Usually I’m a bit of a lazy blogger. The pictures will sit on my camera for a couple days, then I’ll finally upload them, then a couple days later I might actually write the post. Then, when I write the post, I’ll schedule it to post a couple days later. But today… I’m feeling generous. I’ve already washed all the dishes, so I’ve got nothing else left to do but blog this delicious breakfast and post it on the VERY SAME DAY I MADE IT!

I wanted to share this with you, because it would be a GREAT breakfast to make for your mom to celebrate Mother’s Day! I won’t see my mom for breakfast, but I will see her for lunch on Mother’s Day. I have to say, I got pretty lucky when it comes to moms. I got a good one! Here’s a photo of me & her.

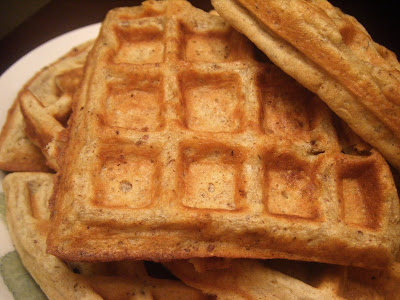
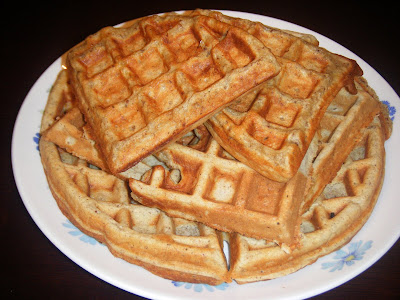
I was a little worried about these waffles, because The Boy usually doesn’t like it when I try recipes that vary too much from the usual. Remember the pumpkin waffles? He ate his, but I know he wasn’t a fan. I think he just doesn’t like pumpkin. But I really wanted to try this banana cinnamon version. I liked the addition of flax seeds, and the use of the whole wheat flour in addition to the white. The Boy doesn’t like it when things are too “wheaty”, so using a combination of flours helps. The original recipe calls for buckwheat flour, which I didn’t have, so I just ground up 1/4 cup oats and used that instead. I think it was a GREAT sub. The smell of these waffles cooking will make your kitchen smell like you’re baking banana bread. And the taste… Oh, these are so delicious. Moist inside, yet still able to crisp up on the outside. The aroma and flavor of the cinnamon is just perfect as well, so don’t skip that step! I was still worried about whether or not The Boy would like them, and he said he did! He said he’d eat them if I made them again, which I most DEFINITELY will.


Print
Banana Cinnamon Waffles
Ingredients:
1 cup all-purpose flour
1/2 cup whole wheat flour
1/4 cup ground rolled oats*
1/4 cup ground flaxseed*
2 tablespoons sugar
1 1/2 teaspoons baking powder
1/2 teaspoon ground cinnamon
1/4 teaspoon salt
1 1/2 cups fat-free milk
3 tablespoons butter, melted
2 large eggs, lightly beaten
1 large ripe banana, mashed
Cooking spray
Directions:
Lightly spoon flours into dry measuring cups; level with a knife. Combine flours, flaxseed, oats, and next 4 ingredients (through salt) in a medium bowl, stirring with a whisk.
Combine milk, butter, and eggs, stirring with a whisk; add milk mixture to flour mixture, stirring until blended. Fold in mashed banana.
Preheat a waffle iron. Coat iron with cooking spray. Spoon about 1/4 cup batter per 4-inch waffle onto hot waffle iron, spreading batter to edges. Cook 3 to 4 minutes or until steaming stops; repeat procedure with remaining batter.
*I used my Magic Bullet Blender to quickly and easily grind the flax seeds & the oats.
According to my calculations, if this recipes yields 4.5 waffles (which mine did) the nutritional info for 1 waffle is:
Calories: 377, Fat: 13g, Sat. Fat: 6g, Cholesterol: 115mg, Sodium: 339mg, Carb: 54g, Fiber: 6g, Protein: 13g
*I used my Magic Bullet Blender to quickly and easily grind the flax seeds & the oats.
Friday, May 8, 2009
The Boys says to me on Sunday “I’m gonna cook something good tomorrow! I don’t know what yet, but I’ll figure something out.” I knew that meant he was in the mood for an adventurous meal. I immediately thought of a dish I had seen in my Google Reader that very day. He’d been mentioning being in the mood for steak lately. It’s just not something I buy or fix very often. It’s not that I don’t eat it, it’s just… I’m cheap! I pulled up my Google Reader and showed him this. His eyes lit up. I read him the ingredients and instructions, and said “You could totally do that, don’t you think?” He agreed he could give it a shot.
We ended using round steak because despite THREE TRIPS TO PUBLIX, one trip to Kroger, and one trip to Harris Teeter (all between Sunday night and Monday afternoon), no flank steak could be found. (PS. Dear Mr. Meat Man at Publix. Please stop promising you’ll have something then not have it.) So The Boy did what any man would do, he improvised with round steak. We also didn’t have any twine, so he improvised again with toothpicks.
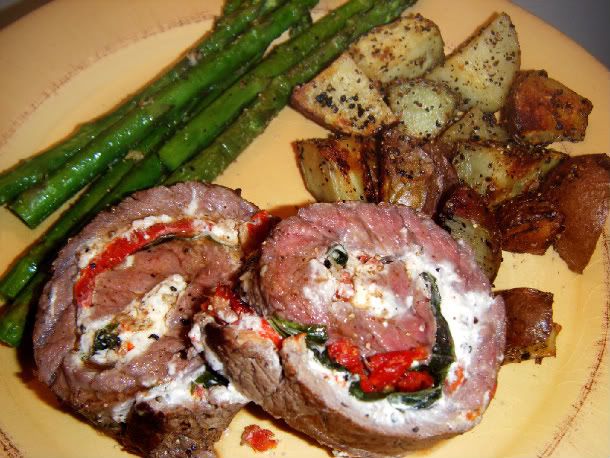
I’ve seen other women have their husband blog when he does the cooking, and… I think that’s asking a bit much from The Boy. Apparently I’m a grammer/punctuation/spelling/word choice/sentence formation nazi. Yeah… Me? Controlling & bossy? No… But he did offer up this bit of advice to all you lovely blog readers: “If I make this again, next time I’ll use less goat cheese and more basil. The goat cheese was really messy.” (Edit… I just found out he used the entire package of goat cheese, which was 4-6oz, while the recipe calls for 2oz. To which he said “Oops, sorry! I guess that’s why most of it oozed out.”) Also I we chose to serve ours with roasted red potatoes & roasted asparagus. Which apparently this decision required him to have three things come out of the oven at the same time. Whoops. Either way, I think they were the PERFECT side items for this delicious steak dinner.
Stuffed Flank Steak with Red Peppers, Sun-Dried Tomatoes, and Goat Cheese
from Confections of a Foodie Bride, originally from Elly Says Opa!
8-10 oz flank steak (or round steak if you can’t find flank)
1 Tbsp oil
1 Tbsp unsalted butter
1 large roasted red pepper, sliced
2 oz goat cheese, softened (we used goat cheese that was rolled in cracked pepper)
1/4 cup sun-dried tomatoes, chopped
1 handful whole basil leaves
Sea salt
Cracked black pepper
1 clove garlic, crushed
3 Tbsp white wine
Preheat the oven to 375.
Butterfly the flank steak and pound to slightly flatten. Spread the soften goat cheese over the steak and top with roasted red peppers, sun dried tomatoes, and basil leaves.
Roll the steak tightly along the grain (if the grain is going left-to-right, roll that way opposed to top-to-bottom) and secure with kitchen twine or toothpics. Season all sides liberally with sea salt and cracked pepper.
Heat 1 Tbsp oil and butter in an oven-safe saute pan over high heat until very hot. Sear the rolled steak 1-2 minutes on each side until very nicely browned. Transfer the pan to the oven and cook until the internal temperature reaches 135. Remove from the oven and tent the pan with foil. Let the meat rest 10 minutes.
Remove the meat from the pan and slice into 3/4-inch rounds. Place the pan over high heat and add the clove of garlic and saute until fragrant. Deglaze the pan with the wine, making sure to scrape up all the browned bits off the bottom and sides. Reduce by 1/2. Season with salt and pepper, if desired.
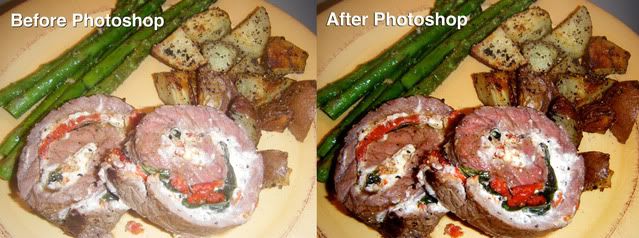
Usually I like to end the post with an alternate photo of the meal. But I only spent approximately 38 seconds taking the photos of this YUMMY meal before we ate, so they all looked pretty much the same. I’m still using the point and shoot with a flash, and it has the tendency to sort of “white out” and overly brighten things. So I spent just a few minutes adjusting the levels in Photoshop, and look at how much better it looks! The Boy was VERY impressed with how much improvement I could make!
Wednesday, May 6, 2009

I am far FAR away from being a pro party planner. Heck I’m far away from being an amateur party planner. But I subscribe to a blog, Hostess with the Mostess, and it’s inspiring. A lot of what I’ve learned is a theme can begin with one thing. This was my one thing that inspired one of my best friend’s birthday party:

My poor friend Katie, I’ll get to my car after shopping at Michael’s and take a photo of something on my iPhone and email it to her. These cupcake liners were one of my emails. Her and I were taking the reins in planning our friend Kalena’s party. Kalena, if anyone knows her, is MISS PINK. She loooves pink, and purple is a close second. So I KNEW I had to PINK IT OUT! As soon as I got home I googled “Hot Pink Cupcakes” and it lead me here, which took me here. Oh yes, these were most definitely pink!! Under the High Chair adapted these cupcakes from a recipe Joy the Baker posted; I adore Joy the Baker, so I knew these would be good!

These were better than good, they were great! I’m not sure about anyone else, but my tastebuds picked up on the kosher salt in the cupcakes. I liked it. It’s hardly noticeable but I think it helps with the sweetness. And OMG, the brown sugar cream cheese frosting was TO-DIE-FOR. Wow! Yum yum yum! I’m going to give you the recipes, but first I’ll show you how I carried along the pink/purple/princess theme.
 I made these poms with directions from Martha Stewart.

I
obsessively called about bought these napkins, and this
pimp cup princess chalice from
Swoozies.

And the day before the party, on her actual birthday, I visited her workplace with this big huge cookie cake! (The school district has a policy were any food brought in must be store bought.)

You know, I used to think it was SO hokey and silly when certain blonde party planning tv hosts would talk about how it’s the extra little things you can do that can really make a party extra special. I would roll my eyes, and be all “Whatever… Who cares.” But you know, having all the little things tie in together (including balloons, more streamers, fresh flowers), it really DID make the party feel a little more special. I think the birthday girl really appreciated it too. As you can OBVIOUSLY tell, I didn’t spend a whole ton of money. I bought some stuff from the dollar store, and I got the fresh flowers on sale because it was the last day of their display date. I am still learning all these party planning tricks, but I’m here to tell you, if I can do it, YOU CAN TOO!
*Especially if you have great friends to HELP you!*

Print
Hot Pink Buttermilk Cupcakes with Brown Sugar Cream Cheese Frosting
Ingredients:
CUPCAKES:
8 Tablespoons unsalted butter, at room temp
1 cup plus 2 Tablespoons granulated sugar
2 large eggs, at room temp
1 teaspoon vanilla
2 cups cake flour
2 teaspoons baking powder
1/4 teaspoon baking soda
1/2 teaspoon kosher salt
3/4 cup buttermilk
1 Tablespoons Red Food coloring
FROSTING:
1 cup butter, softened
6oz cream cheese, softened
1/4 cup light brown sugar, packed
1 teaspoon vanilla extract
pinch of salt
3-4 cups powdered sugar
1-2 tablespoons milk depending on desired consistency
**These are my measurement adjustments and I STILL ended up with a ton of leftover frosting, so you could likely cut this down even more**
Directions:
CUPCAKES:
Preheat the oven to 325. Sift together flour, baking powder and baking soda. Add the kosher salt after sifting and set aside. Measure out the buttermilk and red food coloring. Add the dye to the buttermilk for easier incorporation later.
Cream the butter and the sugar using an electric mixer, until the mixture is pale and fluffy. Add the eggs one at a time, letting the eggs beat for 1 mintue in between additions. Scrape down the bowl in between additions. Add vanilla and beat well.
Add the dry ingredients alternately with the wet ingredients. Start by adding one third of the flour mixture. Mix just to incorporate. Add half of the buttermilk. Add another one third of the flour mixture. Mix to incorporate. Add the last half of buttermilk, followed by the last third of flour.
Spoon into paper lined cupcake pans. Check the cupcakes after 12 minutes.
FROSTING:
Cream the cream cheese in an electric mixer for 1 minute. Scrape down the bowl and add the butter, beating for 1-2 minutes, or until incorporated. (Be sure that the two are at room temperature. Cold cream cheese or butter can make your frosting lumpy.) Add the brown sugar, pinch of salt and vanilla extract, and beat until incorporated. Turn off mixer and add 2 cups of powdered sugar. Turn the mixer on a low speed so the sugar doesn’t fly out of the bowl. Slowly add more sugar alternately with the milk until you reach your desired consistency.

Monday, May 4, 2009
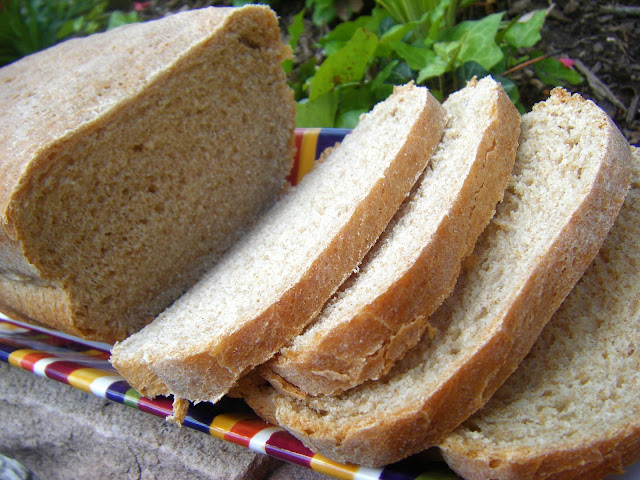
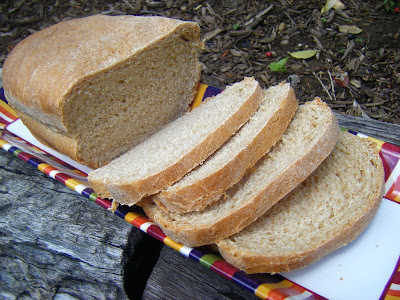
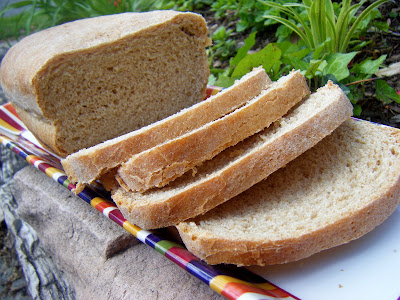
I’ve had a really busy spring. Seven out of nine weeks I have obligations that I have to go out of town for. So, during one of those weekends where I didn’t have to go out of town, my time felt so leisurely! What better way to spend a Sunday than baking bread? After conquering the pretzels, I thought I might finally try to make just a regular loaf of bread. I landed on Smitten Kitchen’s recipe, because I didn’t want a recipe that called for just white flour. I *try* to eat healthy, natural foods, and whole grains are really important in my mind.
The whole bread-making process felt like magic. I would find myself saying “Wow! The yeast rose! AMAZING! MAGICAL!” I was honestly surprised as I followed all the steps, and everything happened just as it should. When I pulled the finished loaf out of the oven, I said “WOW, I made bread. This is real bread!” I also discovered, perhaps I should get a bread knife. Either way, I got it sliced, and I really enjoyed this bread. I used it for a couple sandwiches, but I’ve really enjoyed it as toast. There’s nothing better than than a piece of homemade toast with my Mammy’s homemade grape jelly smothered on top! (Mammy is my paternal grandmother) If haven’t tried to bake your own bread yet, let me tell you, it’s surprisingly easy, and I highly recommend this recipe.
Print
Light Wheat Bread
The Bread Baker’s Apprentice as seen on Smitten Kitchen
Makes one 2-lb. loaf
Ingredients:
2 1/2 cups (11.25 oz) unbleached high-gluten or bread flour
1 1/2 cups (6.75 oz.) whole-wheat flour
1 1/2 tablespoons (.75 oz.) granulated sugar or honey
1 1/2 teaspoons (.38 oz.) salt
3 tablespoons (1 oz.) powdered milk
1 1/2 teaspoons (.17 oz.) instant yeast
2 tablespoons (1 oz.) shortening or unsalted butter, at room temperature
1 1/4 cups (10 oz.) water, at room temperature
Directions:
Stir together the high-gluten flour, whole-wheat flour, sugar (if using), salt, powdered milk, and yeast in a 4-quart mixing bowl (or in the bowl of an electric mixer). Add the shortening, honey (if using), and water. Stir (or mix on low speed with the paddle attachment) until the ingredients form a ball. If there is still flour in the bottom of the bowl, dribble in additional water. The dough should feel soft and supple. It is better for it to be a little too soft that to be too stiff and tough.
Sprinkle high-gluten or whole-wheat flour on the counter, and transfer the dough to the counter, and begin kneading (or mix on medium speed with the dough hook). Add more flour if needed to make a firm, supple dough that is slightly tacky but not sticky. Kneading should take about 10 minutes (6 minutes by machine). The dough should pass the windowpane test and registers 77 to 81 degrees F. Lightly oil a large bowl and transfer the dough to the bowl, rolling it around to coat it with oil. Cover the bowl with plastic wrap.
Ferment at room temperature for 1 1/2 to 2 hours, or until the dough doubles in size.
Remove the dough from the bowl and press it by hand into a rectangle about 3/4 inch thick, 6 inches wide, and 8 to 10 inches long. Form it into a loaf by working from the short side of the dough, rolling up the length of the dough one section at a time, pinching the crease with each rotation to strengthen the surface tension. It will spread wider as you roll it. Pinch the final seam closed with the back edge of your hand or with your thumbs. Place the loaf in a lightly oiled 8 1/2 by 4 1/2 inch bread pan; the ends of the loaf should touch the ends of the pan to ensure an even rise. Mist the top with spray oil and loosely cover with plastic wrap.
Proof at room temperature for approximately 60 to 90 minutes or until the dough crests above the lip of the pan.
Preheat the oven to 350 degrees F with the oven rack on the middle shelf.
Place the bread pan on a sheet pan and bake for 30 minutes. Rotate the pan 180 degrees for even baking and continue baking for 15 to 30 minutes, depending on the oven. The finished loaf should register 190 degrees F in the center, be golden brown on the top and the sides, and sound hollow when thumped on the bottom.
When the bread is finished baking, remove it immediately from the loaf pan and cool it on a rack for at least 1 hour, preferably 2 hours, before slicing or serving.