Monday, August 31, 2009
Happy Birthday! No… wait. That’s not right. I’m forgetting something. Oh, I know, HAPPY BLOGIVERSARY!

I know, I know, technically the first blog entry was August 3rd. But let’s be honest, “blogiversary” is pretty much a made up word, so I think we can be a little loose with the rules. About 7-8 months into blogging I thought about doing a fun giveaway, or a special post or blah blah blah to celebrate my year of blogging. Well, as usual, Erin forgot. I am literally, one of the most forgetful people I know. (Unless I’m forgetting someone.) My family and friends can attest to that.
If you click through my old posts, you’ll see it actually took me quite a while to get the hang of what I was doing. I feel my writing has improved (imagine that, me enjoying writing), and of course the photography has DEFINITELY improved. But most importantly, my cooking & baking skills have really improved. I suppose the best way to learn something is to put yourself out there publicly. I always say, if I can bake/cook something, then anyone can! And this applies to other things too. Surely if I can learn to bake a loaf of bread, then you could learn to play the guitar like you’ve always wanted, grow your own vegetables, learn the rules of soccer by joining a team, or how to sew your children’s clothes. I hope my kitchen adventures have inspired you to step out of your comfort zone and try something new!
One new skill I highly recommend is baking from scratch. Though there are still times I might rely on a boxed mix, those times are getting fewer and far between. When our nephew came to visit us, he & I made brownies. He was so proud to tell his Grandad & his mom that we did it together “and didn’t even use a box!”. That really made me smile inside to hear him say that. There’s a certain sense of accomplishment knowing I didn’t take the easy way out. Not to mention, nine times out of ten, it’s going to taste better! I can instantly tell if I’m eating a cake that came from a mix. And honestly, I’d rather not waste the calories. Also, I’d say probably eight times out of ten, it doesn’t take a significantly longer amount of time to make something from scratch. We’re talking a difference of 5-10 minutes.
Okay, I’m going to get off my soapbox now, before I sound too “Judgy-McJudge”. I don’t judge people that make cakes from a mix. (In fact I recently re-made this recipe, per request.) Those kinds of cakes still have plenty love in them! More love than picking up cupcakes from the grocery. And cupcakes from the grocery are still better than nothing. Let’s face it, we’ve ALLLL had those days when that’s all you have time for. I’m just hoping I have inspired you to step outside your comfort zone, and maybe just try a cake from scratch!

Now, onto THESE cupcakes! The best part about baking from scratch is, different recipes have different methods, and different results. These cupcakes were very different from my stand-by chocolate cake recipe (used here, here, here, and here). The methed is totally different, and the taste is completely different as well. My other recipe results in a cake that is very moist, with the exposed edges/top/bottom being so incredibly moist and wet, it’s shiny. This recipe yielded cupcakes that were much dryer. But don’t think that means this is a dry tasteless cake. It’s far from that. It’s a dryer texture, but it’s still rich and chocolatey. The chocolate flavor is much more intense in this recipe. It’s more complex, and is a more crumbly cake. Again, it’s not dry in the sense of being stale, but dryer in a good way. Part of the complexity comes from the use of bittersweet chocolate. This helps cut the sweetness. If you, or someone you know, enjoys desserts that aren’t as shockingly sweet, this might be a good one to try.
The original recipe calls for it to be topped with chocolate glaze, and while I think that would taste great, I actually had cream cheese frosting hanging out in my freezer, leftover from the Zucchini Spice Cupcakes. It ended up being the perfect amount for these cupcakes. This recipe came from my Perfect Cupcakes book, which a reader so thoughtfully found and shipped to me (Thanks Brienne!). It says it yields 6, but I swear I got at least 10 large cupcakes. I recommend this recipe if you’re looking for a deeper, more intense cupcake that’s not as wet as Hershey’s Perfectly Chocolate Cake recipe. And, if you’re looking for a recipe with a smaller yield.


Print
Chocolate Truffle Cupcakes
Ingredients:
1/2 cup butter
3 oz sugar
1 egg
1 cup self-rising flour (I used 1 cup all purpose plus 1 1/2 teaspoons of baking powder and 1/2 teaspoon of salt)
1 Tablespoon unsweetened cocoa powder
1/2 teaspoon baking powder
3 1/2 oz bittersweet (dark) chocolate, melted
1/2 cup milk
Directions:
Preheat oven to 400 degrees. Prepare a muffin pan by greasing or inserting liners (recommended method).
In a mixing bowl, use a hand-held mixer on medium-high speed to beat the butter and sugar together until light & fluffy. Add the egg and beat well. In another bowl, whisk together the flour, cocoa powder, and baking powder. In alternate batches, stir the melted chocolate, dry ingredients, and milk into the butter mixture. Distribute the batter among the prepared cups.
Bake until the tops spring back when lightly topped, about 20 minutes. Cool in the pan for 5 minutes, then turn out onto a wire rack to cool completely. Serve warm or cool, topped with frosting.

Friday, August 28, 2009
 I know what you’re thinking… “Oh no she DIDN’T!” To which I’ll say… Oh yes I did!
I have some really interesting ice cream recipes bookmarked. One of the earliest weird ones I was intrigued by, was this corn ice cream. I thought I’d probably never get to make it, because WHO ELSE, besides me, would be interested in eating it? I was talking about all the flavors I wanted to try with my coworker, and she expressed interest in the corn flavor. And it just so happened I had (oops) forgotten her birthday.
That same week her & I discussed ice cream, we got our CSA share, and it had corn. It was meant to be. I made the ice cream, and was able to give her a large container of it for her belated birthday.
Whenever people ask what it tastes like, all I know to say is “It tastes like corn, ice cream.” It’s creamy & smooth like ice cream, but not too sweet. And it really does taste like corn. So it’s almost like frozen, creamed corn, except WAY better. It definitely has a fresh, seasonal, and earthy taste. When I eat this, I think of summer as a kid. Running through the maze of the cornfield with the boy next door; family reunions at my great grandma’s; being given the task of shucking a whole bag full of ears of corn on the front step. This is an ice cream truly unlike any other. It’s definitely a dessert, don’t fool yourself into thinking this is your vegetables for the day. It’s ice cream, just not like any you’ve had before.
Print
Corn Ice Cream
Ingredients:
3 ears of corn, kernels cut from cobs and cobs chopped (1-inch pieces)
1 qt whole milk
1 cup heavy cream
1/2 cup sugar
5 large egg yolks
Directions:
Cook corn kernels with cobs, milk, cream, and sugar in a large heavy saucepan over low heat, stirring occasionally, until sugar has dissolved. Simmer, uncovered, 1 hour.
Discard corn cobs. Purée corn mixture in batches in a blender until smooth (use caution when blending hot liquids).
Lightly beat yolks in a large bowl. Slowly add hot corn mixture, whisking. Return mixture to saucepan and cook over low heat, stirring constantly with a wooden spoon, until custard is slightly thickened and registers 170ºF on an instant-read thermometer (do not let boil).
Immediately strain through a fine-mesh sieve into a metal bowl, pressing on and then discarding solids. Chill custard at least 6 hours.
Freeze custard in ice cream maker, in batches if necessary. Transfer to airtight containers and put in freezer to firm up, at least 3 hours.

Wednesday, August 26, 2009
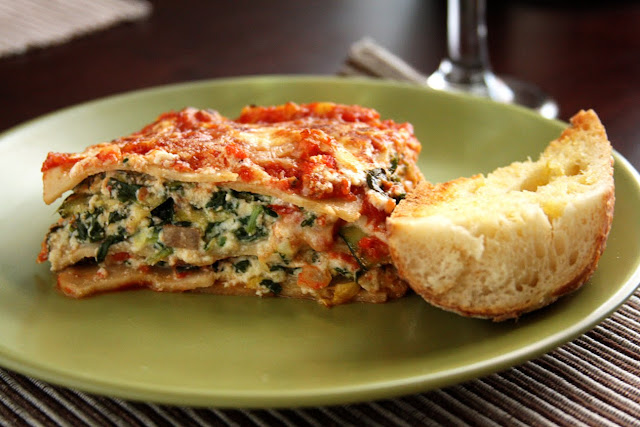
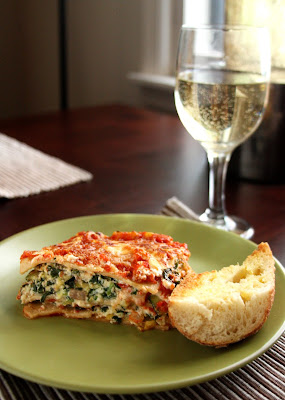
Lasagna is one of those recipes that people call comfort food. It’s warm, with gooey cheese, and a fresh blend of ingredients. As you know, I love making healthy dishes, and have an extra fondness for dishes with lots of color. I was craving lasagna after making my classic, easy recipe for Spinach Lasagna for a friend. Because I gave it away, we didn’t get to eat it. And I think The Boy was a bit disappointed. I promised him I’d make another. So, the weekend rolled around and I had time to devote to a more labor-intensive dish, and also found myself with a plethora of fresh zucchini and squash from my CSA box. (I know I sound like a broken record always talking about my CSA box, but I really do plan our meals around what veggies we get from it.) I’d been wanting to make a lasagna that I could pack EVEN MORE nutritious veggies into by layering the zucchini and squash in.
I turned to this recipe as my guide and inspiration. I’m really glad I took the time to make the tomato sauce instead of just using a jarred pasta sauce. Even though I always used the best jarred sauce, I really like the way the tomatoes and tomato flavor stands out in a homemade version. Plus, it’s cheaper!
Another awesome flavor in this lasagna, is the roasted squash & zucchini. I just adore roasted vegetables. When I sliced the zucchini and squash, I sliced them a little too thin. I forget how they tend to shrink up a little when roasting. So next time I’m do thicker slices. I also threw in mushrooms, as another nutritious filling addition.
Instead of following the original recipe’s suggestion for the filling, I used one based from my other lasagna. I think I could make that one in my sleep! And finally, I used REAL, fresh mozzarella this time, instead of the cheap shredded dry kind. If I’m saving calories by making this meatless, and including all those nutritious veggies, I think it’s totally ok to have the real, moist mozzerella, as opposed to a pre-shredded 2% version.
By now, most of you probably aren’t still reading this, because I’ve rambled on and on. But I must say, this lasagna turned out FABULOUS! I really could taste all the extra details, from the tomatoes, to the roasted vegetables, and most importantly the cheese. This won’t be the only lasagna I cook from now on, as the other one is simpler and faster to prepare; but this will be the one for when I have the time and ingredients to dedicate to preparing. Both deserve space in my tummy.
Print
Roasted Vegetable Lasagna
Ingredients:
Tomato Sauce
1 medium onion
4 cloves of garlic (you can use less, I just like garlic!)
1 teaspoon fennel seeds
1/2 teaspoon chili flakes (or more if you like it!)
1 Tablespoon olive oil
2 28 oz cans whole tomatoes (optional suggestion, use one can of fire roasted tomatoes)
Filling
1 15 oz container part skim ricotta cheese
1 egg beaten
1 10 oz package frozen chopped spinach, thawed and drained
1/4 cup grated parmesan cheese
2 cups sliced mushrooms
salt & pepper as much or little as you like
Additional Ingredients
3-4 zucchinis and squash, sliced
additional chile flakes
salt
pepper
italian herb seasoning (oregano, rosemary, thyme, etc)
fresh mozzarella, sliced (mine was a 5 oz "ball")
lasagna noodles of choice (whether it be homemade, fresh, the non-boil kind, or the kind you boil; I went with the boil kind, whole wheat OF COURSE!)
1/4 cup grated parmesan cheese
Directions:
Prepare tomato sauce: Heat oil in a skillet over medium high heat. Saute onion & garlic. As those begin to soften, add fennel seeds and chile flakes. Cook 3-4 minutes, add the cans of tomatoes. Simmer and puree, or just roughly break up with a wooden spoon (my preferred method).
While the tomato sauce is simmering, prepare the roasted vegetables. Preheat the oven to 400 degrees and arrange the vegetables on a cookie sheet sprayed with olive oil nonstick spray, in an even layer. Sprinkle them with salt, pepper, chili flakes, dried herbs seasoning, and roast for 25-30 minutes until done.
Prepare the filling. Beat the eggs, add in ricotta, spinach, 1/4 cup grated parmesan cheese, mushrooms, salt and pepper, and combine well.
Prepare the noodles if necessary. (I always boil mine in a large skillet, about 4-5 at a time.)
Layer ingredients in a 9x13 pan in the following order: sauce, pasta, filling, veggies, cheese, until you reach the top of the pan. Layer with remaining noodles, sauce, mozzarella cheese, and parmesan cheese. Bake at 425° for 35 to 45, until top is brown and bubbly. Remove from oven and let rest 20 minutes before serving.
Alternatively, you can wrap tightly with foil, and then plastic wrap, and freeze. To reheat, thaw in refrigerator, then place in oven, and turn oven on to 425° for 45 minutes, until top is brown and bubbly. Let rest 20 minutes before serving.
Monday, August 24, 2009
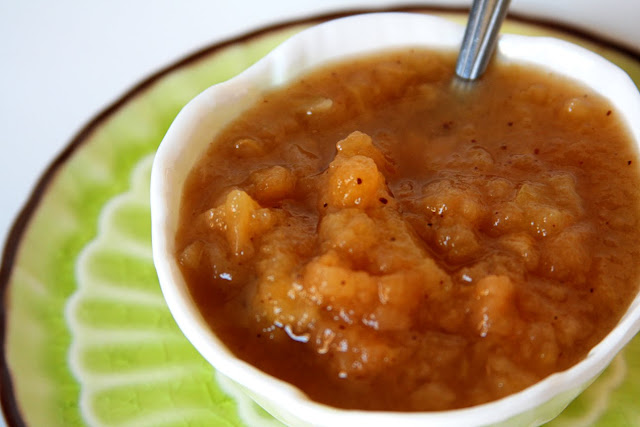
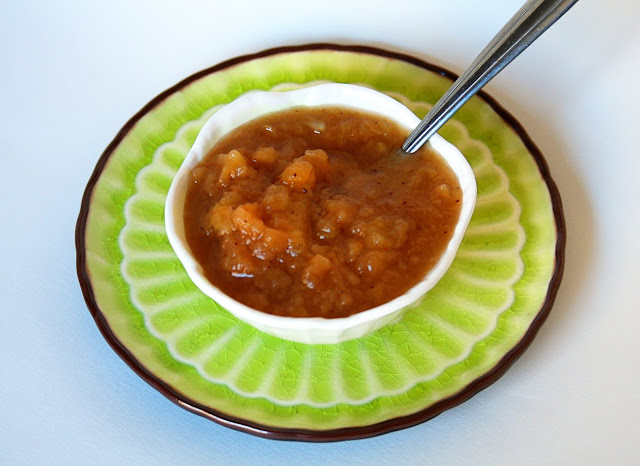
Two of my friends have made homemade applesauce, and were nice enough to share it with me. Up until recently I had never experienced homemade applesauce, but once I did, I knew I had to make it myself as well! It far surpasses anything you buy at the store. It was also incredibly easy to make. I was inspired to finally try it for myself when I saw fresh local apples at a farmstand. I was drawn to the apples because of their golden color, and soft, unshiny skin. This was the exact kind of apples my grandma used to buy huge amounts of from farmstands herself, then she’d prepare, and “put up” in the freezer. We would get to enjoy “Grandma’s Apples”, cooked over low heat in a skillet, seasoned with cinnamon, all year long. It just wasn’t a family gathering without them. I don’t think she ever made applesauce, but it’s basically the same thing, except the apples are cooked longer, and then mashed or blended.
I took inspiration for this recipe from a lot of different sources, including my friend Jamie, the first to share her homemade applesauce with me. The taste and texture are a definite step up from the processed commercial version. I prefer to keep mine just a tiny bit on the chunky side. The freshly ground cinnamon I used really helped make this outstanding. It was a McCormick’s Cinnamon Grinder, and I HIGHLY recommend it. Also, preparing this in my slow-cooker made it super easy, because once I chopped and combined all the ingredients, I just set it to low and let it cook overnight. As a bonus, I woke up to a pretty amazing smelling apartment. I fed some to our 6 year old nephew when he stayed the night with us, and he proclaimed it to be very good! See, it’s kid tested & approved! So what are you waiting for?
Print
Crockpot Applesauce
Ingredients:
6-7 small golden apples, peeled, cored, and chopped
1 granny smith apple, peeled, cored, and chopped
1 Tablespoon brown sugar
juice of 1/2 a lemon
1 strip lemon peel/skin
1/4-1/2 cup water
cinnamon
Directions:
Combine all ingredients and cook over low heat 6-7 hours. Remove peel, and mash or blend to desired consistancy. Refrigerate, and enjoy.