Saturday, December 19, 2009
Apparently I promised The Boy I would make a dessert for his work potluck. (I claim it was a promise I made in my sleep, under the influence of a sleeping pill) Normally I would be really excited to figure out some new, fun dessert to make. But the glitch here was, his party was on a Friday, at noon. And… If you read this blog at all, you should know that I work an incredibly erratic work schedule that ends on Thursday night, technically the wee hours of Friday. I do ALL my baking between late Friday night and Sunday. The LAST thing I wanted to do was come home at 2am and wait for eggs & butter to come to room temp, and then beat this, whisk that, and wait for it to bake. So I climbed up on my counter, scoured the cabinets, and realized I had some sweetened condensed milk. I found a recipe on Eagle Brand’s website for fudge that seemed really easy, so fudge it was!
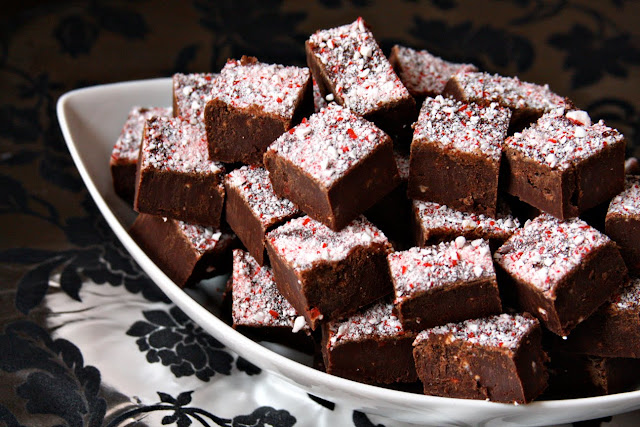
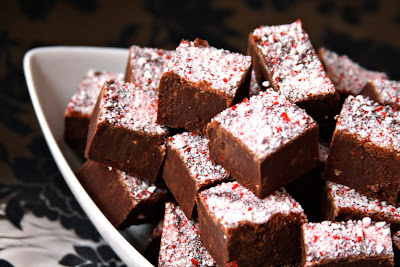
Of course, I couldn’t just make fudge. I mean, I’m ERIN, I have to try some kinda twist on it! So I crushed 5 candy canes in my Magic Bullet Blender, and mixed 1/2 into the fudge, and the other half sprinkled on top. I think it made for some very pretty & festive fudge! I also subbed 1 tsp peppermint extract for the vanilla. In the past I have tried to exchange vanilla for peppermint equally, and wasn’t a fan of the overpowering flavor. In this fudge, the peppermint flavor came from both the candy canes, and the extract. It was the perfect balance for my tastes. And one last optional tip, I added 2 tsp of instant espresso powder, because my original plan was peppermint mocha flavor. It wasn’t quite enough espresso to give the fudge that specific mocha flavor (perhaps I should experiment a little more for that one), but as I learned Friday morning (well after the fudge was set) from TheKitchn, espresso helps give the chocolate an extra kick to get the best flavor. I love it when I have a little serendipity in the kitchen!
Oh, and one more thing… I was sort of hoping for some leftovers, but apparently, this fudge went over pretty well. Not a single piece was left!

Print
Candy Cane Fudge
Ingredients:
3 cups (18 oz.) semi-sweet chocolate (I used Ghiradelli)
1 (14 oz.) can fat free sweetened condensed milk
Dash salt
2 tsp instant espresso powder, or instant coffee *optional* (I do a quick swirl in the Magic Bullet Blender, to be sure this is as finely ground as possible)
1/2 teaspoon vanilla extract
1 teaspoon peppermint extract
5 peppermint candy canes, crushed
Directions:
Line 8- or 9-inch pan with wax paper.
Melt chocolate with sweetened condensed milk, salt, and espresso powder in a heavy saucepan over low heat. Remove from heat; stir in vanilla and peppermint extracts, and half the crushed candy canes. Spread evenly in prepared pan. Top with the rest of the candy cane crumbs.
Chill 2 hours or until firm. (Mine set at room temperature for about 6 hours while I slept) Remove from pan by lifting edges of wax paper; peel off paper. Cut into squares.
**This time last year, I sent off these DELICIOUS Gingerbread White Chocolate Blondies to The Boy’s Christmas party. Man oh MAN were those good!**
Friday, December 18, 2009
One of the reasons I blog is to save recipes. Often it’s recipes from a publication, such as Cooking Light, Bon Appetit, Gourmet; or from another blog source, such as TheKitchn, Serious Eats, or a blogger like Smitten Kitchen. Not nearly as often as I’d like, it could be from a family member. This recipe is very special to me. I received this recipe handwritten. It came in the mail, not an EMAIL, but in a real envelope with a stamp. And it included a note on stationary that said “From the desk of…”
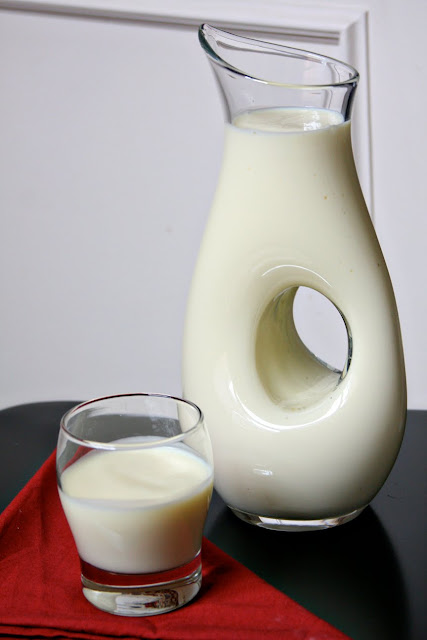
Growing up, I always looked forward to my Grandma’s boiled custard on Christmas Eve. It was an after-dinner ritual to get out the chocolate pie, the sugar cookies, and best of all, the boiled custard. It was always accompanied by these little plastic Christmas cups. If you’ve never had boiled custard, I’m not quite sure how to describe it. I’ve been told it’s like eggnog without the spices and alcohol. One thing is for sure… it’s really rich! I would pour a tiny bit, and sip it slowly. Then I would turn the cup completely upside down and try to get gravity on my side to help get the last remaining bit out. I would let that sweetness settle, then without fail, 20 minutes later I’d do it all again. There’s no telling how much custard I ended up drinking, because lots of little portions add up!
I’m so thankful my Grandma wrote down the recipe and mailed it to me, because now this is a tradition I can carry on. This is truly a recipe I plan on saving forever.

Print
Boiled Custard
adapted from my grandmother's recipe
Ingredients:
1/2 gallon whole milk
2 cups sugar
5 eggs (my mother instructed me to remove the chalaza from the eggs)
2 tsp vanilla
Directions:
In a double boiler warm milk over medium heat, stirring occasionally. Separately, in medium bowl beat eggs. Add sugar to eggs and beat until fluffy.
When milk is hot and steamy (approx 115 degrees on a candy thermometer), slowly add a little to the eggs. Stir well, and continue to slowly add enough milk until eggs are warm. Add back to the milk mixture. Stir constantly while cooking, until mixture coats the back of a spoon (it should be approx 180 degrees, this took around 25-30 minutes for me).
Remove from heat add vanilla, and stir occasionally as it cools. (I just went back in the kitchen ever 5-10 minutes to stir) Store in the milk container (this is how my grandma always store it!). If mixture is lumpy, strain it before putting it in container.
Thursday, December 17, 2009
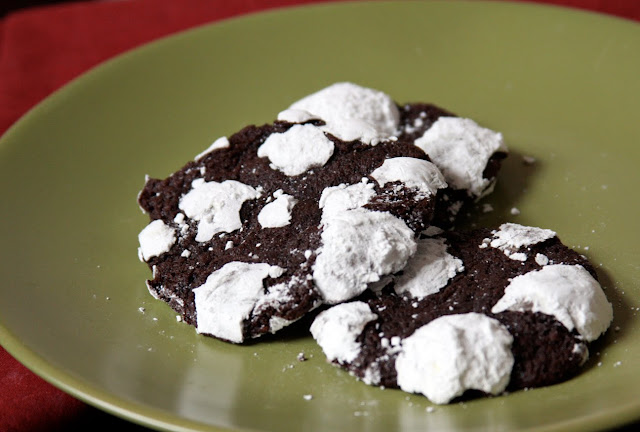
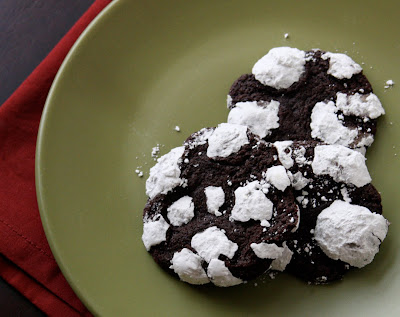
There are cookies, and there are CHRISTMAS COOKIES . I love baking treats during the holiday season that I wouldn’t get the chance to otherwise, like my Chocolate Mint Chocolate Chip Cookies, Buttered Rum Meltaways, and Gingerbread White Chocolate Blondies. Snowcaps, now, that sure doesn’t sound like a cookie you’d bake in June! From the moment I saw these cookies, I knew I’d be baking them this Christmas. The only problem was, that gave me a lot of time to think about how badly I wanted one.
I’m happy to report that these cookies are actually better than I’d hoped! The end result is a cookie that is so soft and chewy, it’s almost brownie-like. The espresso adds a definite complexity that really pushes these cookies a step beyond your average chocolate crinkle cookies. One of the great things about this cookie is, you can make the dough a couple days in advance and then just roll out and bake them when you need them.
As a warning, these get a little bit messy in the rolling process. I would scoop the dough with my medium cookie scoop, then roll it into a ball, and roll the ball around in the powdered sugar. I ended up licking and then washing my hands every 3-4 cookies. Other than slight mess, these were a fun cookie to make, and I can’t wait to make them again next year. Hurry up, your window of opportunity to make these this year is running out!
Print
Chocolate Espresso Snowcaps
from Martha Stewart
Yield: 18
Ingredients:
1/2 cup all-purpose flour
1/4 cup unsweetened cocoa powder
4 teaspoons instant espresso
1 teaspoon baking powder
1/8 teaspoon salt
4 tablespoons unsalted butter, room temperature
2/3 cup packed light-brown sugar
1 large egg
4 ounces bittersweet or semisweet chocolate, melted and cooled
1 tablespoon milk
1/2 cup confectioners sugar, for coating
Directions:
In a medium bowl, whisk together flour, cocoa, espresso, baking powder, and salt. With an electric mixer, beat butter and brown sugar until light and fluffy. Beat in egg until well combined; mix in cooled chocolate. With mixer on low speed, gradually add dry ingredients; beat in milk just until combined. Flatten dough into a disk; wrap in plastic. Freeze until firm, about 45 minutes.
Preheat oven to 350 degrees. Line two baking sheets with parchment paper. Shape dough into 1-inch balls. Place confectioners' sugar into a medium bowl; working in batches, roll balls in sugar twice.
Place balls on prepared baking sheets, 2 inches apart. Bake, rotating sheets halfway through, until cookies have spread and coating is cracked, 12 to 14 minutes; cookies will still be soft to the touch. Transfer to a wire rack to cool completely.
**This time last year I posted my sister’s Graham Cracker Candy. Wonder what that is? Go check it out, but I’m warning you, it’s addictive, LIKE CRACK!**
Tuesday, December 15, 2009

I need to apologize. I’ve baked countless loaves of this bread, and I’m just now sharing it with you. I was never in a hurry to photograph it because, well, if the lighting wasn’t right that day, no rush, I knew I’d make the bread again as soon as we ran out. In fact, even The Boy has “baked” this bread. And by that, I mean I do every single step, but then it might be time for me to go into work, or I might need a nap before a Christmas party, so he follows up and puts the bread in the oven, then takes it out when it’s done. Yes, he bakes bread.
This recipe yields TWO loaves of bread. The first time I made it, I halved it. But the bread was so amazing, I was kicking myself for not baking the full recipe. Recently I shared a 1/2 loaf with my coworker who was working the day shift editing the show I work on, and he left me a voicemail while he was stuck in traffic, snacking on my bread, exclaiming how wonderful it was! The oatmeal gets completely absorbed in the loaf, and it’s tender, soft, and mildly sweet. We love it as toast, sandwiches, grilled cheese, pretty much anything you’d use store-bought sandwich bread for. In fact, one week I didn’t have the opportunity to bake this bread, so I bought some at the store, and The Boy was very disappointed! (as was I) He said it just doesn’t compare to this bread.
I have adapted this recipe slightly. The original recipe calls for whole wheat flour and all purpose, but since I love and trust white whole wheat flour, I used that. Also, instead of melting the butter separately, I added it to the milk while it was warming. To see the original recipe just click on the link, but I can assure you, my adaption works great! And… stay tuned, because I have a delicious spin on this recipe coming soon!
PS. One of these days I’ll get proper loaf pans. This loaf was baked in a silicone pan, which is definitely not ideal for a yeasted bread recipe. It rose outward. And my other pan, a metal one, isn’t the correct size either. I do the best I can. Yeah… One day.

Print
Oatmeal Wheat Bread
adapted from Gourmet Oct 2005
Ingredients:
2 cups milk (skim works fine for me)
1 cup old-fashioned rolled oats (not quick-cooking) plus additional for topping
1/2 cup warm water (105-115°F)
2 tablespoons active dry yeast (about 3 packages)
1/2 cup mild honey
1/2 stick (1/4 cup) unsalted butter
5 cups white whole-wheat flour, divided
1 tablespoon salt
Vegetable oil for oiling bowl
1 large egg, lightly beaten with 1 tablespoon water
Special equipment: 2 (8- by 4-inch) loaf pans
Directions:
Heat milk and butter in a 1 1/2- to 2-quart saucepan over low heat until hot but not boiling, and butter has melted. Then remove pan from heat and stir in oats. Let stand, uncovered, stirring occasionally, until cooled to warm.
Stir together water, yeast, and 1 teaspoon honey in a small bowl; let stand until foamy, 5 minutes. (If mixture doesn't foam, discard and start over with new yeast.) Stir yeast mixture, and remaining honey into cooled oatmeal.
Stir together 4 1/2 cups flour and salt in a large bowl. Add oat mixture, stirring with a wooden spoon until a soft dough forms. Turn out onto a well-floured surface and knead with floured hands, adding just enough of remaining unbleached flour to keep from sticking, until dough is smooth, soft, and elastic, about 10 minutes (dough will be slightly sticky). (Alternatively, combine ingredients in stand mixer with wooden spoon, then knead with bread hook 5-7 minutes.) Form dough into a ball and transfer to an oiled large bowl, turning to coat. Cover bowl loosely with plastic wrap and a kitchen towel; let rise at warm room temperature until doubled in bulk, 1 to 1 1/2 hours.
Lightly butter loaf pans. Turn out dough onto a lightly floured surface and knead several times to remove air. Divide dough in half and shape each half into a loaf, then place 1 loaf in each buttered pan, seam side down, tucking ends gently to fit. Cover loaf pans loosely with a kitchen towel and let dough rise in a draft-free place at warm room temperature until doubled in bulk, about 1 hour.
Put oven rack in middle position and preheat oven to 375°F. Lightly brush tops of loaves with some of egg wash and sprinkle with oats (I don't always do this, as you can see in the photo), then bake until bread is golden and loaves sound hollow when tapped on bottom, 35 to 40 minutes. (Remove 1 loaf from pan to test for doneness. Run a knife around edge of pan to loosen.) If necessary, loosely cover bread with foil for the last 10 minutes of baking.
Remove bread from pans and transfer to a rack to cool completely, about 1 1/2 hours.
**And this time last year I was blogging this incredibly addictive Graham Cracker Candy my sister made for Thanksgiving. Wow… Talk about crazy good!**


