Sunday, February 1, 2009
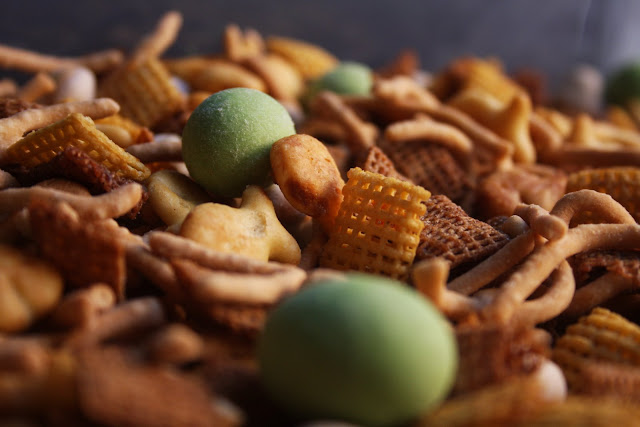
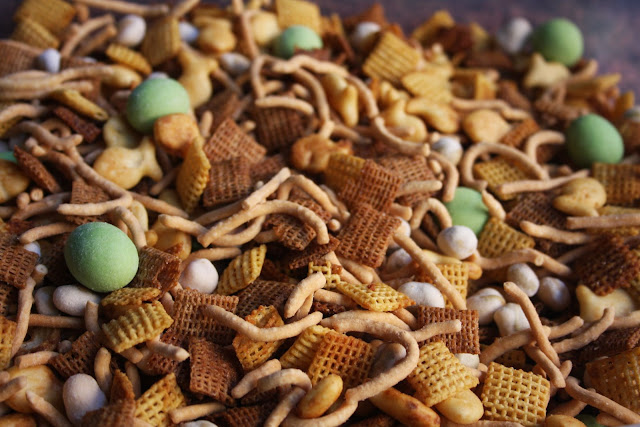
The Boy LOVES these wasabi peanuts I discovered for him. We love to try and get people to eat them. Some people love the peanuts, and some people, well… they end up with tears in their eyes! No joke. There’s no way to explain the taste, especially to someone who has never had wasabi. I let my friend Jamie try them, and she liked them. Then, once while she was out shopping she saw wasabi peas, and thought she’d give them a try. Well… she didn’t like them as much, and gave them to us. The Boy didn’t like snacking on them as much as he liked the peanuts. So they’ve been sitting in our pantry. Waiting…
Then I saw this recipe in the Food Network magazine. It seemed like a really interesting Chex Mix! I thought it would be great at the Super Bowl party we are going to. I must admit, I don’t buy snacks like Goldfish crackers very often, so I just grabbed the Original flavor, not knowing it wouldn’t be the bright orange color. Oh well… And our wasabi peas aren’t as bright green as the Food Network picture. So to pop up the color I added in a couple of The Boy’s wasabi peanuts.
This is a great hot & spicy Chex Mix that will really surprise people, and add a little unexpected kick!

Print
Hot Wasabi Chex Mix
Ingredients:
4 or 5 cups Chex cereal (I used half wheat and half corn Chex)
1 1/2 cups goldfish crackers
1/3 cup teriyaki sauce
4 tablespoons melted butter
1/2 a cup wasabi peas
1/2 cup wasabi peanuts
1/2-3/4 cups chow mein noodles
Directions:
Toss Chex cereal and goldfish crackers in a roasting pan with teriyaki sauce and melted butter. Bake at 250 degrees for 1 hour, stirring every 15 minutes. Spread on paper towels and cool slightly, then toss with wasabi peas, wasabi peanuts, and chow mein noodles.
Wednesday, January 28, 2009
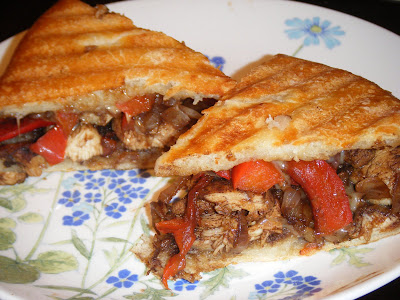
I found this Cooking Light recipe back in the summer before I had a blog. I love this because it tastes like a fancy sandwich I would get at a cafe. The recipe calls for 2 loaves of focaccia, and serves 6, so I easily halved it, and it served 3. It just so happened we had a surprise dinner guest that night. A lot of the time I make recipes that serve 2, so I was very happy that this was on the menu for that night! I did use store-bought focaccia, but ONE DAY I will master bread baking, and make my own. This meal is already in our rotation, and if you try it, don’t be surprised if you want to add it to yours. My changes are in italics. This is the recipe for 6 servings.
Print
Balsamic Glazed Chicken & Bell Pepper Sandwich
Ingredients:
4 teaspoons olive oil, divided
1/2 teaspoon salt, divided
1 1/4 pounds chicken breast tenders
1/2 cup balsamic vinegar, divided (plus more if you choose to marinate)
2 cups red bell pepper strips (about 2 medium)
2 cups vertically sliced onion (about 1 large)
2 (8-ounce) loaves focaccia bread, cut in half horizontally
4 ounces provolone cheese, thinly sliced (this time I actually used swiss because it's what I had on hand, both taste good on this)
1/8 teaspoon black pepper
any type of buttery spread (I chose Smart Balance Light with Flax Oil)
Directions:
(Optional)If possible, marinate chicken in enough balsamic vinegar to cover chicken. Marinate in refrigerator 4 hours or overnight.
Heat 2 teaspoons oil in a large nonstick skillet over medium-high heat. Sprinkle 1/4 teaspoon salt over chicken. Add chicken to pan; cook 1 minute on each side or until lightly browned. Add 1/4 cup vinegar; cook 2 minutes or until chicken is done and vinegar is syrupy. Remove chicken mixture from the pan; cover and keep warm. Wipe pan clean with a paper towel.
Return pan to medium-high heat; add remaining 2 teaspoons oil. Add bell pepper and onion; sauté 7 minutes or until tender. Stir in remaining 1/4 teaspoon salt and remaining 1/4 cup vinegar; cook 1 minute or until vinegar is syrupy.
(Optional) Meanwhile, heat up panini press (or in my case George Foreman). Spread buttery spread onto the inside of the bread halves and grill so that the insides are facing out (I hope this makes sense), and the outer crusts are facing out. Once the bread is grilled and butter has melted remove from panini press or grill.
Arrange chicken mixture evenly over bottom halves of bread; top with bell pepper mixture. Arrange cheese over pepper mixture, and sprinkle with black pepper. Top with top halves of bread. Place a cast-iron or heavy skillet on top of sandwiches; let stand 5 minutes. Cut each sandwich into 6 wedges.
(Optional) Instead of just placing a heavy skillet on mine, I put it back onto the George Foreman (or panini press if you are lucky) and grilled it there to warm the bread more and help melt the cheese.
Tuesday, January 27, 2009
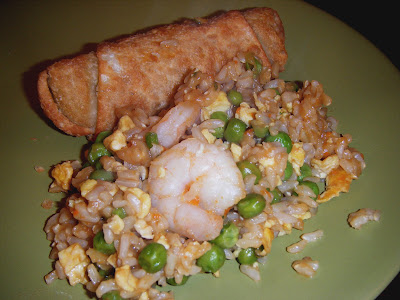
This was a nice weeknight meal. I don’t like to do chicken, chicken, chicken all the time for dinner, and we don’t eat a lot of red meat. So I went in search of a good seafood meal. I found this recipe for Shrimp Fried Rice, and it’s funny, it’s like I didn’t even know I was craving it until I saw this recipe. It’s much much healthier for you than getting chinese takeout, and doesn’t take that long to prepare. Just be sure and watch your portions, because this meal serves 6, and it can be easy to overeat on something this yummy! I served ours with frozen egg rolls, something else I began to crave once I began thinking of the fried rice! The Boy was very excited to see this meal. He actually asked “Is this healthy?!?”. He said it was a good thing I cooked it, he had been eyeing the chinese place across the street from us, so this kept him from going!
Print
Shrimp Fried Rice
Ingredients:
3 (3 1/2-ounce) bags boil-in-bag long-grain rice (I used brown rice)
1 (10-ounce) package frozen green peas
Cooking spray
2 large eggs, lightly beaten
1 tablespoon canola oil
1 cup chopped green onions
1 tablespoon bottled ground fresh ginger (I used fresh ginger)
12 ounces medium shrimp, peeled and deveined
2 tablespoons rice vinegar
2 tablespoons low-sodium soy sauce
1 teaspoon dark sesame oil
1/4 teaspoon salt
Dash of crushed red pepper
Directions:
Cook rice according to package directions, omitting salt and fat. Drain. Remove rice from bags, and return to pan. Add peas to the pan, stirring well. Cover and keep warm.
Heat a nonstick skillet over medium-high heat. Coat pan with cooking spray. Add eggs to pan; cook 1 minute or until set. Remove eggs from pan; coarsely chop. Return pan to heat; add canola oil to pan. Add onions and ginger to pan; sauté 1 minute. Add shrimp to pan; sauté 2 minutes or until shrimp are done.
Add shrimp mixture and eggs to rice mixture; stir well. Combine vinegar and the remaining ingredients, stirring well. Drizzle vinegar mixture over rice mixture; stir well.
Calories:392 (15% from fat); Fat:6.7g (sat 1.1g,mono 2.8g,poly 1.9g); Protein:19.3g; Carbohydrate:61.9g; Fiber:3.2g; Cholesterol:155mg; Iron:4.9mg; Sodium:478mg; Calcium:67mg
Friday, January 23, 2009
I found this recipe in the Jan/Feb ’09 issue of Cooking Light. I’m still on the fence about this magazine. I do enjoy the recipes & articles on food, and I LOVE Cooking Light’s website as a source for great recipes (check out my Cooking Light tag for my tried & true recipes). But I’m just not into reading travel tips, home tips, or exercise moves. FOOD! That’s what I want.
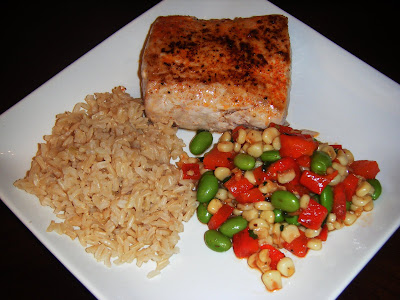
This recipe was pretty simple. I whipped it up on a relaxing Sunday afternoon. I was surprised at how well The Boy enjoyed the succotash! He said he really liked it. I’ll remember to make it again, to serve with other types of white fish (let’s face it, we can’t afford to eat mahimahi very often!).

Print
Seared Mahi-Mahi with Edamame Succotash
from Cooking Light Jan/Feb '09
Yield: 4 servings
Ingredients:
Succotash:
1 medium red bell pepper
1/4 cup finely chopped green onions
2 teaspoons chopped fresh thyme (I used about 1/2 tsp dried)
2 teaspoons rice wine vinegar
2 teaspoons fresh lime juice
2 teaspoons olive oil
1/4 teaspoon salt
1/4 teaspoon ground red pepper
2 garlic cloves, minced
1 1/3 cups frozen corn kernals, thawed (I used white corn, but yellow would be more colorful)
1/2 cup frozen shelled edamame, thawed
Mahi-Mahi:
1 teaspoon olive oil
Cooking spray
4 (6 oz) mahimahi fillets, or other firm white fish
1/8 teaspoon salt
1/8 teaspoon freshly ground black pepper
(optional >1/8 teaspoon ground red pepper, for extra color & kick, this is my addition, not in original recipe)
Directions:
Preheat broiler
To prepare succotash, cut bell pepper in half lengthwise; discard seeds and membranes. Place pepper halves, skin side up, on a foil-lined baking sheet; flatten with hand. Broil 15 minutes or until blackened. Place in a zip-top plastic bag; seal. Let stand 10 minutes. (I placed mine in a glass bowl with plastic wrap on top. OR, you could easily substitue jarred roasted red pepper, just wipe off the oil. BUT, you would miss out on the wonderful aroma of roasting red peppers!) Peel & finely chop. Combine pepper, onions, and next 7 ingredients (through garlic), tossing to combine.
Combine corn and beans in a small microwave-safe bowl; cover with water. Microwave on HIGH 2 minutes; drain. Add corn mixture to bell pepper mixture; toss to combine.
To prepare mahimahi, heat 1 tsp olive oil in a large nonstick skilled coated with cooking spray over medium-high heat. Sprinkle both sides of fish with the salt and black pepper. Add fish to pan. (This is when I sprinkled the top side of the fish with the ground red pepper. I loved the color & flavor it gave the fish, and highly suggest doing this.) Cook 4 minutes on each side or until fish flakes easily with fork. Serve with succotash (and we also added brown rice).
Nutritional info (not including rice): Calories 379; Fat 9.4g (sat 1.5g, mono 5.5g, poly 1.6g); Protein 35.8g; Carb 41.2g; Fiber 8g; Chol 52mg; Iron 3.7g; Sodium 537mg; Calc 84mg


